


Learning how to engrave a Zippo lighter is a great way to turn a standard lighter into something personal and memorable. Whether you want a custom gift, a collector’s piece, or a unique everyday carry item, engraving adds lasting style and character.
This easy guide shows you four popular ways to engrave Zippo lighter, points out possible mistakes, shares care tips, and answers your questions. Let's get started on making a Zippo that will last a lifetime!

In this article:
- Part 1: Four Methods to Engrave A Zippo Lighter
- Method 1: Laser Engraving
- Method 2: Hand Engraving (Hammer & Chisel)
- Method 3: Rotary Tool Engraving
- Method 4: CNC Machine Engraving
- Part 2: Common Mistakes to Avoid When Engraving a Zippo Lighter
- Part 3: Hot Questions about Engraving a Zippo Lighter
Part 1: 4 Ways to Engrave a Zippo Lighter
If you want to personalize your lighter, there are several effective ways to handle Zippo engraving. Some methods are fast and precise, while others offer a more handmade look. The right choice depends on your budget, tools, and experience level.
Below are four practical methods for DIY Zippo engraving, including laser engraving, hand engraving, rotary tools, and CNC machines.
Method 1: Engrave A Zippo Lighter With A Laser Engraver
If you need a really exact and tough design, like a fancy pattern with lots of details or a special logo, then a fiber laser engraver is what you want.
Why laser engraving works so well:
- Excellent detail: Perfect for logos, small text, patterns, and detailed artwork that would be difficult to create by hand.
- Permanent results: Laser engraving creates long-lasting marks that resist fading and wear.
- Works on multiple materials: Many modern laser engravers can handle metal, leather, wood, coated surfaces, and more.
- Fast and consistent: Ideal for gifts, custom orders, or batch engraving because every design comes out clean and uniform.
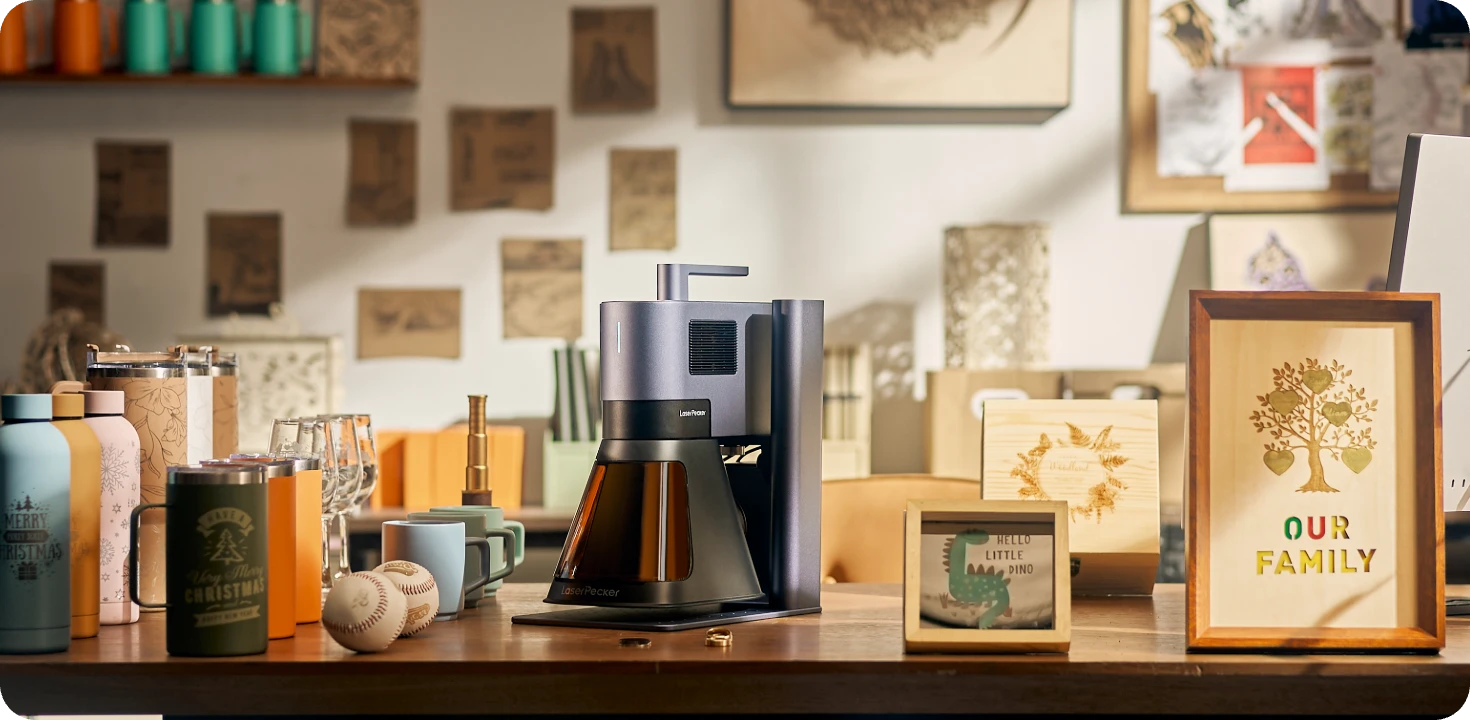
Recommended Laser Engraver for Zippo Lighter Engraving: LaserPecker LP5
The LaserPecker LP5 is a high-precision dual-laser engraver designed for personalized metal engraving projects such as Zippo lighters, EDC gear, jewelry, tools, and custom accessories.
With its 20W fiber laser and ultra-fast galvo system, the LP5 can engrave detailed logos, names, artwork, patterns, and custom text onto metal lighter surfaces with clean and professional-quality results.
-
20W Fiber Laser for Metal Lighter Engraving
The 20W fiber laser is optimized for engraving stainless steel, brushed metal, anodized aluminum, and coated lighter surfaces commonly used for Zippo-style lighters. -
Deep Engraving and Embossing Capability
The LP5 supports deeper metal engraving performance, allowing users to create more visible textures, embossed-style effects, and highly detailed customization on Zippo lighter surfaces. -
High-Precision Engraving for Small Metal Surfaces
The LP5 delivers highly detailed engraving performance suitable for fine text, intricate patterns, QR codes, and personalized designs on compact lighter surfaces. -
10,000 mm/s Ultra-Fast Engraving Speed
The high-speed galvo system allows users to quickly engrave logos, names, portraits, custom graphics, and detailed lighter artwork with efficient workflow.
Basic steps:
- Clean the lighter and secure it in the work area.
- Import or create your design using the compatible software.
- For Zippo lighters, which are metal, an fiber laser is the best choice for engraving. It makes clean, exact marks without hurting the metal.
- Preview the engraving path.
- Begin engraving, monitoring for proper depth and contrast.
- Clean up and check the final design.

Method 2: Engrave A Zippo Lighter By Hand (Hammer & Chisel)
Hand engraving is one of the oldest methods used for Zippo engraving. Instead of machines, you use a hammer and engraving chisel to carve directly into the lighter by hand. This method takes patience and control, but it creates a unique handmade look that many collectors appreciate.
If you want a true DIY Zippo engraving experience, hand engraving gives every lighter its own character because no two designs come out exactly the same.
Why people choose hand engraving:
- Fully handmade: Every engraving is slightly different, giving the Zippo a personal touch.
- Classic appearance: Hand-cut engravings often have a traditional and artistic style that machine engraving cannot fully copy.
- Great for collectors: Many collectors value craftsmanship and handmade detail over perfect precision.
Basic steps:
- Get your gear: engraving chisel, small hammer, and a plain Zippo.
- Lightly sketch your design on the Zippo (with pencil).
- Carefully carve along the lines with the hammer and chisel, going slowly.
- Lightly polish the lighter to show off the engraving.
Method 3: Engrave A Zippo Lighter With A Rotary Tool
A rotary tool is one of the most affordable ways to engrave a Zippo at home. Tools like a Dremel allow you to carve names, initials, symbols, and simple artwork directly onto the lighter surface without needing expensive equipment.
This method is popular for DIY Zippo engraving because it is easier to learn than hand engraving and much cheaper than laser or CNC machines.
What's so great:
- More exact than hand engraving.
- Cheaper than laser engravers
- Good for beginners adding names, designs, or small pictures.
Basic steps:
- Clean the lighter. If it's a matte, use a cleaner to ready it.
- Cover spots to avoid scratches.
- Put a fine engraving bit on the rotary tool and trace your design evenly.
- Take off the tape and polish to make it clear.
Method 4: Engrave A Zippo Lighter With A CNC Machine
CNC engraving is one of the most precise ways to create detailed and consistent Zippo engraving designs. A CNC machine uses computer-controlled cutting tools to engrave the lighter surface with high accuracy, making it ideal for complex artwork, logos, and repeat production.
If you need professional-quality results or want to produce multiple matching lighters, CNC engraving is a strong option.
What's so great:
- The results are crazy accurate, and every lighter comes out the same.
- Perfect for business projects when you need exact copies or more complex drawings
- Reduces errors and keeps each one looking identical.
Basic steps:
- Secure the Zippo on the CNC bed; ensure flatness and proper zeroing (one user measured the stack height carefully and taped a manila folder as a template).
- Import artwork, adjust LPI (lines per inch), speed, and power settings.
- Run a test engrave on a template to verify settings.
- Execute the actual engraving, then clean and inspect the result.
Comparison of Zippo Lighter Engraving Methods
| Method | Tools Required | Skill Level | Speed | Precision & Detail | Cost |
|---|---|---|---|---|---|
| Hand Engraving (Hammer & Chisel) | Hammer, chisel, polishing tools | Advanced | Slow | Artistic but less consistent | Low |
| Rotary Tool Engraving | Rotary tool with engraving bits | Beginner to Intermediate | Medium | Good for simple designs | Affordable |
| Laser Engraving | Fiber laser engraver and software | Easy to learn | Very fast | Extremely precise | Higher upfront cost |
| CNC Machine Engraving | CNC machine and engraving software | Intermediate to Advanced | Fast | Very high precision | Expensive |
Part 2: Common Mistakes to Avoid When Engraving a Zippo Lighter
Even with the right tools, mistakes can still happen during Zippo engraving, especially if you are new to the process. Small errors can damage the lighter surface, ruin the design, or reduce engraving quality. Avoiding these common problems will help you get cleaner and more professional-looking results.
1. Do Not Skip Surface Preparation
Fingerprints, oil, dust, and dirt can affect engraving quality. Before you engrave a Zippo lighter, clean the surface with alcohol or a microfiber cloth. If the lighter has a painted or matte coating, test a small hidden area first.
2. Use the Right Engraving Tool
Different Zippo finishes require different engraving methods. Some lasers struggle with chrome surfaces, while rotary tools can slip on polished metal. Always make sure your engraving tool is compatible with the lighter material.
3. Avoid Incorrect Depth and Speed Settings
Engraving too deeply can damage the lighter, while engraving too lightly may create faded results. Test your settings on scrap metal before engraving the actual Zippo.
4. Keep the Lighter Secure
If the Zippo moves during engraving, the design can become uneven or scratched. Clamp the lighter firmly in place or use strong tape to prevent movement.
5. Preview the Design First
Always check the design layout before engraving. Use software previews, stencils, or templates to confirm alignment and spacing before starting.
6. Control Heat Build-Up
Too much heat from a laser or rotary tool can discolor or warp the metal surface. Work slowly and avoid excessive power settings.
7. Practice Before Engraving the Final Zippo
If you are learning how to engrave a Zippo at home, practice on scrap metal or inexpensive lighters first. This helps you improve control and avoid costly mistakes.

Part 3: FAQs about Engraving A Zippo Lighter
1. What's the best way to start engraving?
If you're just getting into engraving, laser engraving is the way to go if you want to be precise and fast and get professional-looking results. It works on things like metal Zippos, wood, and leather. You can get really fine detail (0.01 mm), finish designs quickly, and the software is easy to use. You'll get reliable, quality results right away.
2. Can all Zippo lighters be engraved?
Most Zippo lighters can be engraved, including brass, chrome, matte, and coated finishes. However, different materials respond better to different engraving methods. Chrome surfaces usually work best with laser or CNC engraving for cleaner results.
3. What kind of engraving lasts the longest?
Laser and CNC last a super long time, especially if they go deep. Hand and rotary depend on how good you are. If you want it to last forever, go with the deeper machine engraving.
4. Could engraving ruin my Zippo?
If you do it where you're supposed to, it won't hurt anything. Stay away from where it bends and where the parts come together. Mostly, you don't want to mess up how it looks by going too deep or not lining it up right.
Conclusion
Now that you know how to engrave a Zippo lighter, you can choose the method that best fits your budget, skill level, and design goals. From DIY Zippo engraving with hand tools to creating a professional laser engraved Zippo, each method offers a unique way to personalize your lighter.
With the right preparation and care, your engraved Zippo lighter can stay sharp and stylish for years.