


Laser engraving has never been more accessible. With a budget under $200, you can now have a laser engraver to create custom gifts, personalize everyday items, or even start a small side business.
But with so many options available, choosing the right machine can quickly become overwhelming.
Don't worry! This guide will quickly walk you through the key differences, highlight the best options, and help you choose the one that fits your needs.

Part 1: Most People Make Mistakes When Choosing a Laser Engraver Under $200
Mistake #1: Focus only on power (wattage)
When shopping for a laser engraver under $200, most people make the same mistake: they focus only on power (wattage).
It sounds logical — higher wattage means stronger performance, right? But in reality, at this price range, that assumption often leads to the wrong purchase.
The truth is: power is only one part of the equation.
What actually matters more for most users is:
- Ease of use
- Setup time
- Portability
- Real-world usability
Many high-power machines in this category are open-frame DIY devices. While they look impressive on paper, they often require:
- Manual assembly
- Software setup (like LightBurn or GRBL)
- Laser focusing and calibration
- Ongoing adjustments and maintenance
- Dedicated workspace due to their size
- A steeper learning curve for beginners
For beginners, this can quickly turn a simple creative tool into a time-consuming technical project. This is why many first-time buyers end up frustrated — not because the machine isn't powerful enough, but because it's not designed for how they actually want to use it.
Mistake #2: Ignoring Ease of Use and Setup Complexity
Another common mistake is underestimating how much time and effort it takes to actually get a laser engraver up and running.
Many machines under $200 require more than just plugging in and pressing start. In reality, users often need to:
- Assemble the frame and components
- Install and configure software
- Adjust focus and positioning manually
- Run multiple test engravings before getting usable results
For experienced users, this might be part of the process. But for beginners, it can quickly become overwhelming.
The reality is that if a machine is difficult to set up, you're far less likely to actually use it regularly.
Mistake #3: Overlooking Where and How You'll Actually Use It
Most buyers focus on specs, but forget to consider a simple question: Where will I actually use this machine?
Many budget engravers are designed as desktop devices, meaning they:
- Require a fixed workspace
- Need constant access to a power outlet
- Are not easy to move or store
This limits how and where you can use them.
In reality, many people want more flexibility — such as:
- Using the engraver in different rooms
- Taking it to events or markets
- Working on larger or fixed objects
If portability isn't considered upfront, the machine may end up sitting unused more often than expected.
Part 2: Types of Laser Engravers Under $200
Before choosing a laser engraver, it's important to understand that not all machines in this price range are the same. In fact, most products under $200 fall into three distinct categories, each designed for a very different type of user.
Type 1: Open-Frame DIY Engravers
Examples include machines like ACMER S1, and Creality Falcon.

These are the most common laser engravers in this price range. They use a mechanical frame (XY system) to move the laser head across the work area.
Pros:
- Higher power (typically 5W–10W)
- Can cut thin wood and acrylic
- Larger working area
Cons:
- Requires assembly and initial setup
- Steeper learning curve (software, focusing, calibration)
- Bulky and not portable
Best suited for users who enjoy hands-on projects and don't mind spending time learning and setting up the machine.
Type 2: Low-Power Enclosed Engravers
Examples include DAJA, AlgoLaser and WAINLUX models.

These machines are designed to be simple, affordable, and beginner-friendly. They usually come pre-assembled and are much easier to start using compared to DIY engravers.
Pros:
- Lower price point
- Compact and lightweight
Cons:
- Low power (around 3W)
- Small engraving area
- Limited long-term capability
Best for casual users who want to try laser engraving without a big investment.
Type 3: Portable Galvo Engravers
A standout example in this category is the LaserPecker LP1 Plus.

Unlike traditional machines that move the entire laser module, these engravers use a galvo system to direct the laser beam using mirrors.
This results in a completely different experience compared to frame-based machines.
Pros:
- Nearly no assembly required
- Setup in under 2 minutes
- Faster engraving speeds (up to 600 mm/s)
- Pocket-size portability
- Supports power bank operation
- Can engrave from multiple angles
Cons:
- Smaller working area
- Limited cutting capability
Best for beginners, creators, and anyone who values convenience, portability, and ease of use.
Part 3: Best Laser Engravers Under $200 (Top Picks)
Now that you understand the different types of laser engravers, let's look at the best options available under $200. These picks are based on real-world usability, performance, and overall value — not just raw specs.
Each product below represents a different category, so you can quickly find the one that fits your needs.
#1: Best Overall — LaserPecker LP1 Plus
If you're looking for the most balanced and beginner-friendly option, the LaserPecker LP1 Plus stands out.
- Galvo laser system (faster and more efficient)
- 600 mm/s engraving speed
- True pocket-size portability
- Power bank supported
- 2-minute setup, no assembly required

Best for beginners, creators, and anyone who wants a simple, portable solution.
#2: Best for Power — Creality Falcon 10W
The Creality Falcon is one of the most powerful machines you can get in this price range.
- 10W diode laser for stronger cutting ability
- Large working area
- Compatible with LightBurn and other software
However, it comes with trade-offs:
- Requires assembly and setup
- Open-frame design with exposed laser
- Less beginner-friendly
#3: Best DIY Option — ACMER S1
The ACMER S1 is one of the most popular budget engravers, offering a good balance between price and capability.
- Multiple power options (2.5W / 3.5W / 6W)
- 130 × 130 mm working area
But like most DIY machines:
- Requires setup and calibration
- Better suited for engraving than cutting
Best for hobbyists who enjoy hands-on projects and customization.
#4: Cheapest Option — WAINLUX K10
The WAINLUX K10 is a simple, entry-level engraver designed for basic tasks.
- Very compact design
- Beginner-friendly setup
- Affordable price point
However:
- Limited performance
- Small working area
Part 4: Why LaserPecker LP1 Plus Stands Out
With so many laser engravers under $200 focusing on power or price, very few actually improve the user experience. That's exactly where the LaserPecker LP1 Plus is different.
Instead of competing on wattage, it redefines what a beginner-friendly laser engraver should be: faster, simpler and truly portable.
1. Galvo Technology (Faster & More Efficient)
Unlike traditional engravers that rely on mechanical movement (XY rails), the LP1 Plus uses a galvo system to control the laser beam with mirrors.

This means:
- No heavy mechanical movement
- Faster engraving speeds
- Smoother and more precise output
In fact, the LP1 Plus can reach speeds of up to 600 mm/s, making it significantly faster than most frame-based machines in this price range.
In simple terms: it moves the laser beam, not the machine.
2. True Portability (Pocket-Size Design)
Many engravers claim to be "portable," but are still desktop devices.
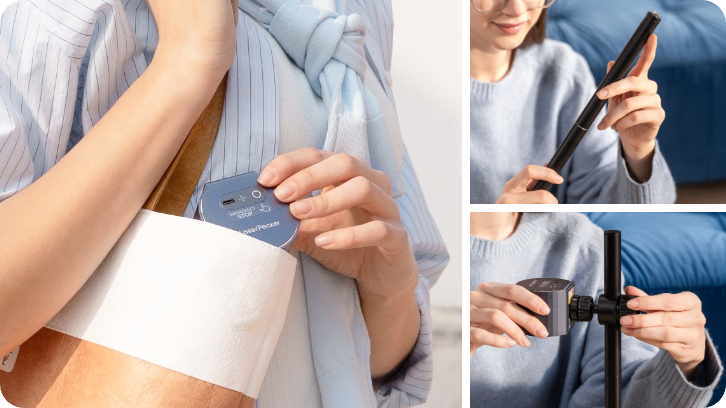
The LP1 Plus is fundamentally different:
- Ultra-compact (fits in a backpack)
- Lightweight (~0.7 kg total)
- Designed for real mobility
It's a pocket-size laser engraver that lets you create anywhere — not just move it between tables.
3. Multi-Angle Engraving (More Creative Freedom)
Traditional engravers can only work directly beneath the laser head.
The LP1 Plus features an adjustable stand with multi-angle positioning, allowing you to engrave on:
- Slanted surfaces
- Curved or irregular objects
- Items that can't be easily placed flat

This flexibility opens up far more creative possibilities compared to fixed-frame machines.
4. Plug-and-Play Simplicity (2-Minute Setup)
Most budget engravers require:
- Assembly
- Calibration
- Software setup
The LP1 Plus removes all of that.
You can go from unboxing to engraving in just minutes:
- Connect via mobile app
- Import or create your design
- Start engraving
It's designed so even beginners can start creating immediately, with almost no learning curve.
5. Power Bank Support (Use Anywhere)
Most laser engravers require a wall outlet, limiting where you can use them.
The LP1 Plus can be powered by a standard 5V Type-C power bank, making it ideal for:
- Outdoor use
- Markets and pop-up shops
- Events and workshops

This transforms it from a tool into a mobile business device.
6. Designed for Real Users (Not Just Specs)
Most machines under $200 are built around technical specifications.
The LP1 Plus is built around real usage scenarios:
- DIY projects
- Personalized gifts
- Small business customization
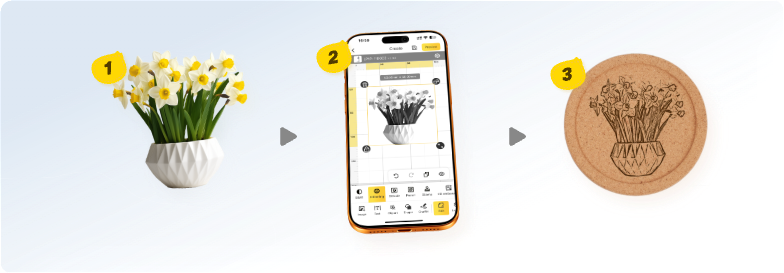
With app-based control, built-in design tools, and instant engraving workflows, it removes the complexity that usually comes with laser engraving.
Conclusion
There's no single "perfect" laser engraver under $200 — it ultimately depends on what you value most. Some machines prioritize power, while others focus on affordability.
But for most users, especially beginners and creators, the better choice is the one that balances ease of use, portability, and real-world usability.
That's where LaserPecker LP1 Plus stands out. With its galvo system, compact design, and plug-and-play experience, it offers a faster, simpler, and more flexible way to start engraving.