















Cork boards are versatile, easy-to-work-with materials used for bulletin boards, wall decorations, soundproofing, and DIY projects. Whether you're crafting small pieces or cutting thick panels for home improvement, choosing the right tool ensures clean, precise cuts without wasting cork.
In this guide, we'll explore several cutting methods, their pros and cons, and help you decide the best approach for your project.

In this article:
- Method 1: Cut Cork Board Using a Laser Cutter
- Method 2: Cut Cork Board Using a Craft Knife
- Method 3: Cut Cork Board Using Cricut
- Method 4: Cut Cork Board Using a Rotary Cutter
- FAQs: Hot Questions about Cutting Cork Board
Method 1: Cut Cork Board Using a Laser Cutter
Laser cutting is one of the most precise and efficient ways to cut cork board. Using a focused laser beam, you can achieve clean edges, smooth curves, and intricate shapes that are difficult to produce with manual tools.
This method is ideal for creating custom cork boards, decorative shapes, signage, or detailed designs for DIY projects and small-scale production.
Steps to Cut Cork Board with a Laser Cutter
- Create Your Design: Use vector design software to define the shape, size, or pattern you want to cut.
- Prepare the Cork Board: Place the cork sheet flat on the laser bed and ensure it is clean and stable.
- Adjust Laser Settings: Set appropriate power, speed, and passes based on the thickness of the cork board.
- Test Cut (Recommended): Run a small test to fine-tune settings and avoid overburning.
- Run the Cutting Process: Start the laser to cut along the design path with precision.
- Remove and Clean: Take out the cut pieces and wipe away any residue or debris.
Laser cutting works best with thin to medium cork sheets. Proper ventilation is recommended, as cork can produce smoke during cutting.
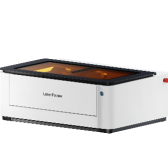
Recommended Laser Cutter for Cork Board: LaserPecker LX2
To achieve clean cuts, consistent results, and efficient production when working with cork board, choosing the right laser cutter is essential. Desktop laser cutters like the LaserPecker LX2 stand out as a versatile solution, offering the precision needed for smooth cork edges, the speed required for batch cutting, and the flexibility to handle different project sizes.
Whether you're creating custom cork boards, decorative shapes, or small-batch products, the LX2 helps streamline the entire process—from design to finished piece—making it suitable for both DIY creators and small business use.
-
High-Precision Laser Spot
The LX2 delivers precise cutting on cork sheets, producing clean edges and smooth curves. This is essential for custom cork shapes, signage, and detailed decorative designs. -
Dual-Laser System (Diode + 1064nm IR)
The diode laser is ideal for cutting cork, wood, and similar materials, while the IR module supports engraving on coated surfaces. This flexibility allows you to expand beyond cork into mixed-material projects. -
High-Speed Performance (Up to 1000 mm/s)
Fast cutting and engraving speeds help you produce multiple cork pieces efficiently, making it suitable for batch production or small business workflows. -
Large Working Area (500 × 305 mm)
The spacious workspace allows you to cut larger cork boards or process multiple pieces in one run, reducing setup time and improving productivity. -
Camera-Assisted Alignment & Point-to-Shape Positioning
Built-in camera positioning ensures accurate placement of your design on the cork surface, helping you align shapes precisely and reduce material waste. -
Modular, Tool-Free Laser Swapping
Easily switch between laser modules to match different materials or project needs without complicated setup, improving workflow flexibility. -
Wide Material Compatibility
In addition to cork, the LX2 supports materials such as wood, acrylic, leather, and more—allowing you to create layered designs or combine cork with other materials.

Steps to Cut a Cork Board with a Laser Cutter
- Create Your Design: Use vector design software to define the shape, size, and any details such as patterns, holes, or text.
- Select the Cork Material: Choose an appropriate cork sheet thickness based on your project (thin sheets for crafts, thicker boards for structure).
- Prepare the Material: Place the cork board flat on the laser bed and ensure it is clean, dry, and securely positioned.
- Set Laser Parameters: Adjust power, speed, and passes according to the thickness and density of the cork. Run a small test cut if needed.
- Run the Cutting Process: Start the laser to cut along the design path with precision.
- Inspect the Cut: Check edges for completeness and accuracy. Repeat cutting if necessary for thicker material.
- Clean the Surface: Remove dust or residue from the cork surface using a soft cloth or brush.
- Finish and Use: Assemble, mount, or integrate the cut cork piece into your final project.
Method 2: Cut Cork Board Using a Utility Knife or Craft Knife
Using a utility knife or craft knife is a simple and affordable way to cut cork board. This method is ideal for basic shapes, straight cuts, and small DIY projects where precision requirements are moderate.
Steps to Cut Cork Board with a Utility Knife
- Measure and Mark: Use a ruler and pencil to mark your cutting lines clearly on the cork surface.
- Secure the Material: Place the cork board on a cutting mat or stable surface to prevent slipping.
- Align a Straight Edge: Use a metal ruler as a guide for straight cuts.
- Score the Surface: Lightly score along the marked line with the knife to create a guide path.
- Cut Through Gradually: Make multiple passes with steady pressure instead of forcing a deep cut in one go.
- Finish the Edges: Trim any rough edges or uneven sections for a cleaner result.
This method works best for thin to medium cork boards. While it is easy to start with, achieving smooth curves or intricate shapes can be challenging compared to machine-based cutting methods.
Method 3: Cut Cork Board Using Cricut
Using a Cricut machine is a convenient way to cut thin cork sheets with better accuracy than manual tools. It is especially suitable for small crafts, decorative shapes, and repeatable designs.
Steps to Cut Cork Board with Cricut
- Create Your Design: Use Cricut Design Space to create or import your shape, text, or pattern.
- Select the Right Material Setting: Choose the appropriate setting for cork or a similar material.
- Prepare the Cork Sheet: Place a thin cork sheet (typically 1–2 mm) onto a strong grip cutting mat and press it firmly to secure.
- Load the Machine: Insert the mat into the Cricut and ensure proper alignment.
- Cut the Design: Start the cutting process. Multiple passes may be required depending on thickness.
- Unload and Remove: Carefully remove the cork pieces from the mat to avoid tearing.
- Clean the Edges: Trim or refine edges if needed for a smoother finish.
This method works best with thin cork sheets. For thicker cork boards or more complex cuts, a laser cutter provides higher precision and cleaner edges.
Method 4: Cut Cork Board Using a Rotary Cutter
A rotary cutter is a quick and efficient tool for cutting cork board, especially for straight lines and repetitive cuts. It is commonly used in crafting and works best with thin to medium cork sheets.
Steps to Cut Cork Board with a Rotary Cutter
- Measure and Mark: Use a ruler and pencil to mark your cutting lines clearly on the cork surface.
- Prepare the Work Surface: Place the cork board on a self-healing cutting mat to protect your table and ensure smooth cutting.
- Align a Straight Edge: Position a metal ruler or guide along the cutting line for accuracy.
- Roll the Cutter: Apply steady pressure and roll the rotary cutter along the edge in one smooth motion.
- Repeat if Needed: For thicker cork, make additional passes to cut through completely.
- Refine Edges: Trim any uneven edges for a cleaner finish.
This method is ideal for straight cuts and simple shapes. However, it is less suitable for intricate designs or detailed curves compared to machine-based cutting methods.
FAQs: Hot Questions about Cutting Cork Board
Q1. Can I cut cork board with a regular utility knife?
Yes, a utility knife works well for thin to medium cork boards. Use a sharp blade and cut in multiple passes rather than trying to cut through in one go.
Using a metal ruler as a guide helps keep lines straight. For thicker cork, this method requires more effort and may result in less smooth edges.
Q2. How thick should cork board be for different projects?
The ideal thickness depends on your application. For bulletin boards or wall panels, 5–10 mm cork is common. For crafts and DIY projects, thinner sheets around 1–3 mm are more suitable.
For insulation or soundproofing, thicker cork boards (10–20 mm) are typically used. Choose based on the strength and durability required.
Q3. Can I cut cork board with a handsaw?
Yes, a handsaw can be used, especially for thicker cork boards. A fine-tooth blade is recommended to reduce tearing.
Make sure the cork is securely fixed before cutting, and sand the edges afterward for a smoother finish.
Q4. What's the best tool for cutting thick cork boards?
For thick cork boards, a laser cutter or a fine-tooth saw are the most effective options. A laser cutter provides clean edges and high precision, making it ideal for decorative or detailed work.
For basic construction cuts, a saw is more cost-effective, though it may require additional finishing.
Conclusion
Cutting cork board can range from simple DIY methods to high-precision techniques, depending on your tools and project needs.
Utility knives and rotary cutters are affordable and convenient for basic projects, while saws are better suited for thicker materials. For precise shapes, clean edges, and efficient production—especially in decorative or commercial use—laser cutting is the most effective solution.
By choosing the right method based on material thickness, design complexity, and production scale, you can achieve clean, accurate results and get the most out of your cork board projects.