















Chalkboards are versatile, affordable, and widely used in homes, classrooms, cafés, and retail spaces. They are perfect for writing notes, displaying menus, creating signage, or even designing interactive walls for kids.
One of the biggest advantages of making your own chalkboard is customization. You can choose the size, shape, material, and design to match your space—whether it's a rustic wooden board, a removable wall decal, or a uniquely shaped sign.
In this guide, we'll explore three popular methods for making a chalkboard: hand-painting, using chalkboard paper, and laser cutting. Each method offers different benefits, helping you choose the best option for your needs.

In this article:
- Method 1: Make a Chalkboard via Hand-Painting
- Method 2: Make a Chalkboard with Chalkboard Paper
- Method 3: Make a Chalkboard via Laser Cutting
- FAQs: Hot Questions about Making a Chalkboard
Method 1: Make a Chalkboard via Hand-Painting (Wood or MDF Board)
Hand-painting is one of the simplest and most affordable ways to make a custom chalkboard. By applying chalkboard paint to a wood or MDF board, you can quickly create a functional writing surface without specialized tools.
Steps to Make a Chalkboard by Hand-Painting
- Prepare the Surface: Sand the wood or MDF board to create a smooth, even surface. Wipe away dust.
- Apply Primer (Optional): Use a primer for better paint adhesion, especially on raw wood.
- Paint with Chalkboard Paint: Apply 2–3 thin, even coats using a brush or roller. Let each coat dry completely.
- Let It Cure: Allow the painted board to cure for at least 24–48 hours.
- Season the Surface: Rub chalk over the entire surface and wipe it off before first use.
This method is ideal for DIY projects, home use, or small decorative chalkboards.
Method 2: Make a Chalkboard with Chalkboard Paper
Using chalkboard paper (also known as chalkboard vinyl) is a quick and mess-free way to create a reusable chalkboard surface. It comes with a self-adhesive backing, making it easy to apply to walls, wood, glass, or other smooth surfaces.
Steps to Make a Chalkboard with Chalkboard Paper
- Choose the Surface: Select a clean, flat surface such as a board, wall, or panel.
- Clean and Dry: Wipe the surface to remove dust, oil, or moisture for better adhesion.
- Measure and Cut: Cut the chalkboard paper to the desired size and shape.
- Peel and Apply: Slowly peel off the backing and stick the paper onto the surface, smoothing out bubbles as you go.
- Press Firmly: Use a card or scraper to ensure strong adhesion and remove any air pockets.
- Season the Surface: Rub chalk across the surface and wipe it off before first use.
This method is ideal for quick setups, temporary installations, or decorative projects where flexibility and ease of use are important.
Method 3: Make a Chalkboard via Laser Cutting
Laser cutting provides a precise and flexible way to create custom chalkboards. It is ideal for producing unique shapes, signage, or small-batch products with a professional finish.
There are two common approaches when using laser cutting for chalkboards:
Situation 1: Laser Cut Chalkboard Adhesive Film
This method focuses on applying chalkboard adhesive film onto a solid base (such as an MDF board, wood panel, or acrylic sheet) before laser cutting. By doing this, you can create clean, durable chalkboard signs or custom-shaped pieces with a more professional finish.
- Prepare the Base Material: Choose a flat surface such as MDF, wood, or acrylic, and clean it to remove dust or oil.
- Apply the Chalkboard Film: Carefully stick the adhesive film onto the surface, smoothing out any bubbles for a firm, even finish.
- Create Your Design: Use vector software to design the shape or sign you want to cut.
- Place on Laser Bed: Position the laminated material (film + board) onto the laser cutter.
- Adjust Laser Settings: Set appropriate power and speed based on the base material thickness.
- Cut the Shape: Run the laser to cut through the board, forming your final chalkboard sign or custom shape.
- Finish and Clean: Remove any residue and check edges for a clean, polished result.
This approach is ideal for making rigid chalkboard signs, labels, or decorative pieces with precise shapes and smooth edges.
Situation 2: Laser Cut Painted Wood or MDF Board
In this method, a wood or MDF board is first coated with chalkboard paint, then cut into precise shapes using a laser cutter. This approach is ideal for rigid, durable chalkboards.
- Prepare and Paint: Apply chalkboard paint to the board and let it fully cure.
- Create the Design: Prepare the cutting file in vector format.
- Secure the Material: Place the painted board on the laser bed.
- Adjust Settings: Set appropriate power and speed based on material thickness.
- Cut the Shape: Use the laser to cut the board into the desired form.
- Finish the Edges: Clean or lightly sand edges if needed.
Laser cutting is best suited for custom shapes, detailed designs, and repeatable production, making it a strong choice for both creative projects and small business use.
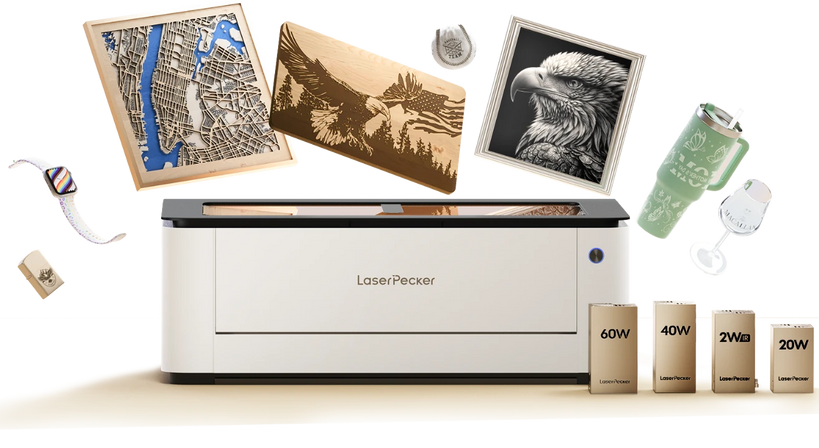
Recommended Laser Cutter for ChalkBoard: LaserPecker LX2
To achieve clean cuts, consistent results, and efficient production when making chalkboards, choosing the right laser cutter is essential. Desktop laser cutters like the LaserPecker LX2 stands out as a versatile option, offering precision, speed, and flexibility for both DIY projects and small-scale production.
-
High-Precision Laser Spot
The LX2 delivers extremely fine cutting and engraving precision, enabling clean edges on chalkboard vinyl and painted MDF. This ensures sharp lettering, smooth curves, and professional-quality chalkboard signs. -
Dual-Laser System (Diode + 1064nm IR)
With interchangeable diode (20W/40W/60W) and IR laser modules, the LX2 can handle a wide range of materials—from wood and MDF to coated surfaces and metals—making it highly versatile for different chalkboard styles. -
High-Speed Performance (Up to 1000 mm/s)
The fast engraving and cutting speed significantly improves productivity when creating multiple chalkboard signs, menu boards, or decorative pieces. -
Large Working Area (500 × 305 mm)
The spacious work area allows you to cut larger chalkboards or batch multiple designs in one run, reducing setup time and improving efficiency. -
Camera-Assisted Alignment & Point-to-Shape Positioning
A built-in 12MP camera combined with smart positioning helps accurately align designs on materials, ensuring precise placement—especially useful for pre-painted boards or layered projects. -
Modular, Tool-Free Laser Swapping
The LX2 features a modular design that allows quick, tool-free swapping of laser modules. This makes it easy to adapt to different materials and project requirements without complicated setup. -
Wide Material Compatibility
Supports materials such as wood, acrylic, leather, metal, glass, and more—giving you flexibility to create various chalkboard styles, from rigid signs to decorative pieces.
With camera-assisted positioning, adjustable power settings, and high cutting precision, the LX2 enables you to create custom chalkboard shapes, signage, and detailed designs with clean, professional edges.
Steps to Make a Chalkboard with a Laser Cutter
- Create Your Design: Use vector design software to define the shape, size, and any decorative elements such as borders or text.
- Choose the Material: Select either chalkboard adhesive film or a wood/MDF board depending on your project.
- Prepare the Surface: For boards, apply chalkboard paint and allow it to fully cure. For adhesive film, ensure it is clean and flat.
- Set Up the Laser Cutter: Place the material on the laser bed and secure it properly to prevent movement.
- Adjust Laser Settings: Configure power, speed, and passes based on the material type and thickness.
- Run the Cutting Process: Start the laser to cut the shape or design with precision.
- Clean and Finish: Remove any residue, peel protective layers if needed, and lightly clean edges for a polished result.
- Install or Apply: Mount the board or apply the cut chalkboard film to your desired surface.
FAQs: Hot Questions about Making a Chalkboard
Q1. Can I make a chalkboard on any surface?
Yes, chalkboards can be created on a variety of surfaces such as wood, MDF, drywall, metal, or glass. Smooth surfaces generally produce the best results.
Before applying chalkboard paint or adhesive film, make sure the surface is clean and properly prepared. Glossy or oily surfaces should be lightly sanded to improve adhesion, while overly rough surfaces may affect writing quality. Testing a small area first is recommended.
Q2. How long does chalkboard paint last?
When applied correctly, chalkboard paint can last for years. For best results, apply multiple thin coats and allow sufficient drying and curing time (typically 24–48 hours).
In high-use environments, the surface may wear over time. It can be refreshed by lightly sanding and applying a new coat of paint.
Q3. Can I use colored chalk on a chalkboard?
Yes, both white and colored chalk can be used on chalkboards. The surface works the same regardless of chalk color, making it suitable for creative designs, menus, or educational use.
Chalkboard paper is also a great option for temporary or flexible setups, especially in rental spaces or for removable signage.
Q4. Can I make a chalkboard wall?
Yes, turning a wall into a chalkboard is a popular option for kitchens, offices, and children's rooms. Start by repairing any surface imperfections, then sand and clean the wall.
Apply a primer followed by chalkboard paint, and allow it to fully cure before use. This ensures a smooth, durable writing surface.
Conclusion
Making a chalkboard is a simple and creative project that can be adapted for home, school, or business use. You can choose between painting, adhesive chalkboard paper, or laser cutting depending on your needs.
For basic use, hand-painting or chalkboard paper offers a quick and affordable solution. For more precise, customized, or professional applications—such as signage or branded displays—laser cutting provides greater accuracy and design flexibility.
By selecting the right method, you can create a chalkboard that is both functional and visually appealing, tailored perfectly to your space and purpose.