


Pencil engraving is a simple way to turn ordinary pencils into personalized gifts, branded merchandise, or unique craft items. Whether you're creating custom school supplies, wedding favors, or promotional products, learning how to engrave pencils can help you produce clean and professional results.
There are several ways to personalize pencils depending on the tools you have available. Some methods use advanced machines such as a laser engraving machine, while others rely on manual techniques like stamping or rotary engraving.
In this guide, we'll explore 5 effective pencil engraving methods — from precision laser engraving to simple DIY techniques. Each method includes the tools required, step-by-step instructions, and the situations where it works best.

In this article:
- Method 1: Engrave Pencils with a Laser Engraving Machine
- Method 2: Engrave Pencils with a Rotary Tool
- Method 3: Engrave Pencils with a Small CNC Machine
- Method 4: Engrave Pencils with a Cricut Maker
- Method 5: Engrave Pencils via Stamping
- FAQs: Top Questions About Pencil Engraving
Method 1: Engrave Pencils with a Laser Engraving Machine
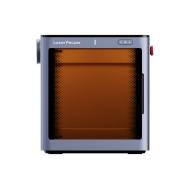
Using a pencil laser engraving machine is one of the most precise and efficient ways to create custom pencils. A laser engraver works by focusing a beam of light onto the pencil surface, burning or etching the material to produce clean, permanent markings.
This method is ideal for creating personalized pencils with names, logos, serial numbers, or decorative designs. Because the process is computer-controlled, it allows consistent engraving across multiple pencils, making it perfect for both small businesses and batch production.
What You'll Need
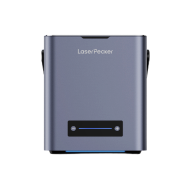
- Pencil engraving machine like the LaserPecker LP2 Plus
- Pencils with engravable surfaces (wood, coated wood, metal, or plastic)
- Design software such as LightBurn or LaserPecker software
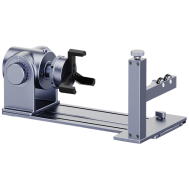
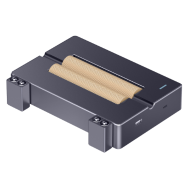
- Optional: Rotary Attachment or Roller for round pencils
Steps to Laser Engrave a Pencil
Step 1: Create the Design
Use engraving software to type the name, message, or logo you want on the pencil. Resize the design so it fits the pencil barrel (usually around 5–8 mm in height).
Step 2: Position the Pencil
Place the pencil on the engraving bed. For round pencils, use a rotary attachment to rotate the pencil during engraving. Hexagonal pencils can be placed flat in a jig to prevent rolling. The same setup is often used when engraving pens or other cylindrical objects.
Step 3: Adjust Laser Settings
Set the correct power, speed, and focus based on the pencil material. Wooden pencils typically require lower power than coated or painted pencils. Proper configuration is important for consistent results, which is why many engravers rely on tested laser engraving material settings.
Step 4: Preview the Engraving Area
Use the frame or preview function in the software to confirm the design is aligned correctly on the pencil.
Step 5: Start Engraving
Begin the engraving process and monitor the machine to ensure the pencil remains stable.
Step 6: Clean the Pencil
After engraving, wipe the surface with a soft cloth to remove smoke residue or debris.
Pros and Cons of Laser Pencil Engraving
Pros
- Extremely precise and professional results
- Ideal for logos, names, and detailed designs
- Fast and efficient for batch production
- No physical contact with the pencil
Cons
- Laser engravers require an initial investment
- Learning basic engraving software is necessary
Method 2: Engrave Pencils with a Rotary Tool
A rotary tool is a simple and affordable way to personalize pencils. This method uses a small spinning engraving bit to carve text, symbols, or patterns directly into the pencil surface.
While it doesn't offer the same precision as a pencil engraving machine, rotary engraving is a popular DIY method for creating handmade custom pencils. It works best on wooden pencils and is ideal for small projects or one-off personalized gifts.
Required Tools
- Rotary tool or electric engraving pen
- Fine engraving bits (diamond or carbide tips work well)
- Clamp, vise, or non-slip mat to hold the pencil
- Wooden or painted pencils
Steps to Engrave a Pencil with a Rotary Tool
Step 1: Plan the Design
Sketch the name, initials, or pattern onto the pencil using a fine marker or stencil. Keep the design small so it fits comfortably along the pencil barrel.
Step 2: Secure the Pencil
Place the pencil in a soft-jaw vise, clamp, or non-slip mat to prevent it from moving while engraving.
Step 3: Select the Engraving Bit
Attach a fine engraving bit to the rotary tool. Diamond tips are excellent for detailed lines, while burr bits can produce deeper engravings.
Step 4: Start Engraving
Turn on the rotary tool at a moderate speed and gently follow the guide marks. Apply light pressure and let the tool do the cutting to avoid damaging the pencil.
Step 5: Clean the Engraving
After engraving, wipe away wood dust with a soft cloth. You can fill the engraved lines with paint or ink to make the design more visible.
Pros and Cons of Engraving Pencils with a Rotary Tool
Pros
- Affordable and widely available tools
- Great for DIY pencil engraving projects
- Ideal for one-off personalized pencils
Cons
- Lower precision compared to laser or CNC engraving
- Requires steady hands for clean results
- Not suitable for engraving large batches of pencils
Method 3: Engrave Pencils with a Small CNC Machine
A small CNC machine offers precision engraving through automated cutting, ideal for deep and repeatable marks on pencils—perfect for small workshops, makerspaces, or those creating custom products in batches. It's especially effective on wooden pencils, whether flat, round, or hexagonal, with the right clamping setup.
Required Tools:
- Small CNC
- Custom pencil jig or clamp (to hold pencils securely)
- Wooden or painted pencils
Steps to Engrave a Pencil with a Small CNC Machine
Step 1: Create or Import the Design
Design text or a logo using CAD software and generate toolpaths with CAM software. Adjust size to fit the pencil surface (usually ~5–8 mm high).
Step 2: Secure the Pencil
Place the pencil in a custom jig, rotary attachment, or soft clamp to prevent movement. For round pencils, a rotary fixture or V-block may help.
Step 3: Select the Bit and Machine Settings
Install a fine engraving bit. Set spindle speed, feed rate, and depth of cut according to material.
Step 4: Test and Align
Run a test pass on scrap wood or an extra pencil. Use the CNC's zeroing feature to ensure proper alignment.
Step 5: Start Engraving
Launch the engraving job and monitor the process for accuracy, bit wear, or tool drag.
Pros and Cons of Engraving a Pencil with CNC Machine
👍Pros:
High precision and consistency
Supports deeper engraving than laser
👎Cons:
Requires design and CNC software knowledge
Setup takes time, especially for alignment
Not ideal for one-off or quick jobs
Method 3: Engrave Pencils with a Small CNC Machine
A small CNC machine is another precise method for pencil engraving, especially for makers, workshops, and small businesses producing custom pencils in batches. Unlike laser engraving, CNC machines use a rotating cutting bit to carve designs directly into the pencil surface.
This method is ideal for engraving deeper marks on wooden pencils and offers excellent repeatability. With the right jig or fixture, a CNC pencil engraver can engrave multiple pencils with identical text or logos.
Required Tools
- Small CNC engraving machine
- Fine engraving bit or V-bit
- Custom pencil jig, clamp, or V-block to hold the pencil securely
- CAD/CAM software to create toolpaths
- Wooden or painted pencils
Steps to Engrave a Pencil with a CNC Machine
Step 1: Create the Design
Use CAD software to design the text or logo you want engraved. Keep the design small enough to fit the pencil barrel (typically around 5–8 mm high).
Step 2: Secure the Pencil
Place the pencil in a jig, clamp, or V-block to prevent movement during engraving. Proper alignment is important to keep the engraving centered.
Step 3: Choose the Engraving Bit
Install a fine engraving bit such as a V-bit. Set the correct spindle speed, feed rate, and cutting depth according to the pencil material.
Step 4: Test the Setup
Run a test engraving on scrap material or an extra pencil to verify alignment and cutting depth.
Step 5: Start the Engraving Job
Launch the CNC program and monitor the machine to ensure smooth engraving and consistent results.
Pros and Cons of Engraving Pencils with a CNC Machine
Pros
- Very precise and repeatable engraving
- Produces deeper engravings than laser methods
- Good for small-batch production of custom pencils
Cons
- Requires CNC setup and software knowledge
- Longer preparation and alignment time
- Less convenient for quick or one-off engravings
Method 4: Engrave Pencils with a Cricut Maker
The Cricut Maker can also be used for light pencil engraving using its engraving tip. Although it does not cut deeply like a laser or CNC machine, it can scratch or etch designs into coated pencil surfaces to create decorative personalization.
This method works best on painted, foil-covered, or coated pencils. It is especially popular for craft projects, school supplies, and DIY gifts where users already own a Cricut machine.
Required Tools
- Cricut Maker with engraving tip
- StrongGrip cutting mat
- Painters tape or glue dots to secure the pencil
- Pencils with coated surfaces (painted or foil-wrapped pencils work best)
Steps to Engrave a Pencil with Cricut Maker
Step 1: Design the Text or Pattern
Open Cricut Design Space and create your design. Names, initials, or short messages work best. Set the operation type to Engrave.
Step 2: Prepare the Cutting Mat
Place the pencil on the StrongGrip mat and secure it with painter's tape or adhesive to prevent movement during engraving.
Step 3: Align the Design
Use the grid inside Design Space to align the engraving area with the pencil's position on the mat.
Step 4: Start the Engraving Process
Click “Make It” and allow the Cricut Maker to lightly etch the design into the pencil coating.
Step 5: Clean the Pencil
Remove the pencil from the mat and wipe off any debris. For better visibility, you can fill the etched design with paint or a metallic marker.
Pros and Cons of Engraving Pencils with Cricut Maker
Pros
- Great option for Cricut users who already own the machine
- Easy way to personalize pencils at home
- Good for craft projects and school supplies
Cons
- Produces surface etching rather than deep engraving
- Works best only on coated or painted pencils
- Less precise than laser or CNC engraving
Method 5: Engrave Pencils via Stamping
Stamping is a traditional method used to create permanent marks on pencils. Instead of cutting or burning the surface like a pencil engraving machine, stamping presses a metal letter or logo into the pencil using mechanical force.
This method is commonly used in bulk manufacturing or simple workshop setups because it allows fast and repeatable marking. It works best on wooden hexagonal pencils, which provide a flat surface for the stamp.
Required Tools
- Metal letter stamps or custom logo stamp
- Hammer or mallet (brass or dead-blow hammer recommended)
- Flat working surface or stamping block
- Wooden pencils (preferably hexagonal or flat-sided)
Steps to Stamp a Pencil
Step 1: Select the Stamp
Choose the letter, number, or logo stamp you want to imprint on the pencil.
Step 2: Position the Pencil
Place the pencil on a hard, stable surface. Align the stamp on the flat side of the pencil where the design should appear.
Step 3: Strike the Stamp
Hold the stamp vertically and strike it firmly with a hammer. A single controlled hit usually produces the cleanest impression.
Step 4: Repeat if Needed
If stamping individual letters, reposition the stamp carefully for each character to maintain alignment.
Pros and Cons of Stamping Pencils
Pros
- Very simple method with minimal equipment
- Produces deep and permanent markings
- Fast process for repeating simple designs
Cons
- Works best only on flat-sided wooden pencils
- Alignment can be difficult when stamping letters individually
- Applying too much force can crack softer pencils
FAQs: Common Questions About Pencil Engraving
Q1. What is pencil engraving?
Pencil engraving is the process of etching text, logos, or patterns onto a pencil surface using tools such as a pencil engraving machine, rotary engraver, CNC machine, or stamping tools. The result is a permanent mark that personalizes the pencil.
Q2. What types of pencils can be engraved?
Wooden pencils are the most common for pencil engraving because they provide a stable surface. However, coated pencils, metal pencils, and some plastic pencils can also be engraved depending on the engraving method used.
Q3. How do you engrave a name on a pencil?
To engrave a name on a pencil, create a small text design and apply it using a laser engraver, rotary tool, CNC machine, or stamping method. Laser engraving is often the easiest way to engrave names on pencils with high precision.
Q4. What tools are used for pencil engraving?
Common tools include a pencil laser engraving machine, rotary engraver, CNC engraving machine, Cricut Maker with engraving tip, or manual stamping tools. Some artists also explore different wood engraving tools when working with wooden pencils.
Q5. Is pencil engraving permanent?
Yes. Most engraving methods create permanent marks because the design is etched or pressed into the material rather than printed on the surface.
Q6. Can you engrave multiple pencils with the same design?
Yes. Machines such as laser engravers and CNC engravers allow batch processing, making it easy to produce multiple identical custom pencils.
Q7. What is the best method for engraving pencils?
The best method depends on your needs. A pencil engraving machine or laser engraver offers the highest precision and efficiency, while rotary tools or stamping are better for DIY projects or small batches.
Q8. Can you personalize pencils for gifts or events?
Yes. Personalized pencils are commonly used for wedding favors, school supplies, promotional giveaways, and handmade gifts.
Q9. What designs can be engraved on pencils?
Most engraving methods allow names, logos, serial numbers, short messages, or decorative patterns to be engraved on the pencil surface.
Q10. How do you make custom pencils?
To make custom pencils, choose a personalization method such as laser engraving, CNC engraving, or stamping. Then create a design with text or graphics and engrave it onto the pencil barrel.
Conclusion
Pencil engraving is a simple way to transform ordinary pencils into personalized gifts, branded merchandise, or creative craft items. Whether you're engraving pencils for school supplies, business branding, or handmade products, the right method depends on the tools you have and the level of precision you need.
Here's a quick summary of the most effective ways to engrave pencils:
- Laser engraving machines deliver the most precise and professional results, making them ideal for custom pencil engraving and batch production.
- Rotary tools are affordable and perfect for DIY pencil engraving projects.
- CNC machines offer excellent precision and consistency for small workshop production.
- Cricut engraving works well for decorative personalization on coated pencils.
- Stamping provides a traditional and durable way to mark wooden pencils in bulk.
No matter which method you choose, learning how to engrave pencils allows you to create unique and meaningful designs. With the right tools and technique, you can easily make custom pencils for gifts, events, or business branding.


