


The best wood engraving tools can help you create clean lettering, decorative patterns, detailed artwork, custom signs, and personalized gifts. However, the right tool depends on the finish you want, the size of the project, your experience level, and whether you need one-of-a-kind craftsmanship or repeatable production.
Common tools for engraving wood include hand chisels and gouges, rotary tools, laser engravers, and CNC routers. Hand tools provide direct control and a traditional carved finish, while powered and computer-controlled tools make it easier to produce detailed or repeated designs.
In this guide, we compare four types of wood engraving tools, explain their advantages and limitations, and help you choose the best option for your woodworking projects.

In this article:
- Part 1: Common Use Cases for Wood Engraving Tools
- Part 2: Four Types of Engraving Wood Tools
- Type 1: Wood Laser Engravers
- Type 2: Hand Tools
- Type 3: Electric or Power Wood Engraving Tools
- Type 4: CNC Wood Routers
- Part 3: How to Pick the Tools for Wood Engraving?
- Part 4: FAQ about Wood Engraving Tools
Part 1: Common Uses for Wood Engraving Tools
Wood engraving can be used for decorative, functional, artistic, and commercial projects. Common applications include:
- Engraving names, quotes, house numbers, and logos on wooden signs.
- Personalizing cutting boards, coasters, picture frames, boxes, and gifts.
- Creating illustrations, photographs, patterns, and textured artwork.
- Adding decorative details to furniture, cabinets, and architectural woodwork.
- Marking product information, branding, or serial numbers on wooden products.
- Making inlays, relief carvings, models, ornaments, and craft components.
The best wood engraving tool depends on the application. A laser engraver is well suited to detailed graphics and repeatable personalization, while chisels and gouges are better for deep, tactile carving. Rotary tools offer a practical middle ground, and CNC routers are commonly used for large or production-oriented projects.
Part 2: Four Types of Wood Engraving Tools
The four main categories of engraving tools for wood are laser engravers, hand tools, power tools, and CNC routers. Each produces a different finish and offers a different balance of control, speed, engraving depth, repeatability, and cost.
Type 1: Wood Laser Engravers
A wood engraver uses a focused laser beam to remove or darken a controlled area of the wood surface. Because the machine follows a digital design, it can reproduce fine lettering, logos, illustrations, and photographs with consistent results.
Main advantages:
- Produces fine details and clean, repeatable designs.
- Processes multiple items without physically contacting the surface.
- Works directly with compatible digital design files.
- Requires no engraving bits that become dull during normal operation.
- Supports personalization, prototyping, and small-batch production.
Things to consider:
- Engraving contrast varies by wood species, grain, moisture, finish, and laser settings.
- Smoke and fine particles require suitable ventilation or filtration.
- Unknown, treated, painted, or glued materials should be checked before processing.
- Test settings on a spare piece before engraving the final workpiece.
LaserPecker LP4 – A Portable Wood Engraver for for Wood:
The LaserPecker LP4 combines a 10W 450 nm blue diode laser with a 2W 1064 nm infrared laser. For wood projects, the blue diode laser can engrave compatible solid wood, plywood, bamboo, and other wood-based materials.
- Detailed engraving: Create lettering, line art, photographs, logos, and decorative patterns.
- Compact work area: The standard 160 × 120 mm working area is suitable for coasters, small signs, ornaments, boxes, and gifts.
- Fast processing: A maximum engraving speed of 2,000 mm/s supports efficient personalization and small-batch work.
- Digital workflow: Import or create designs and reproduce them consistently across multiple workpieces.
- Portable design: The compact structure suits home studios, craft rooms, market stalls, and small workshops.
- Expandable workspace: The optional Slide Extension increases the working area to 160 × 300 mm.
The LP4 is best suited to users who prioritize portability, detailed engraving, and multi-material personalization. Engraving and cutting results depend on the wood species, thickness, composition, and selected settings.

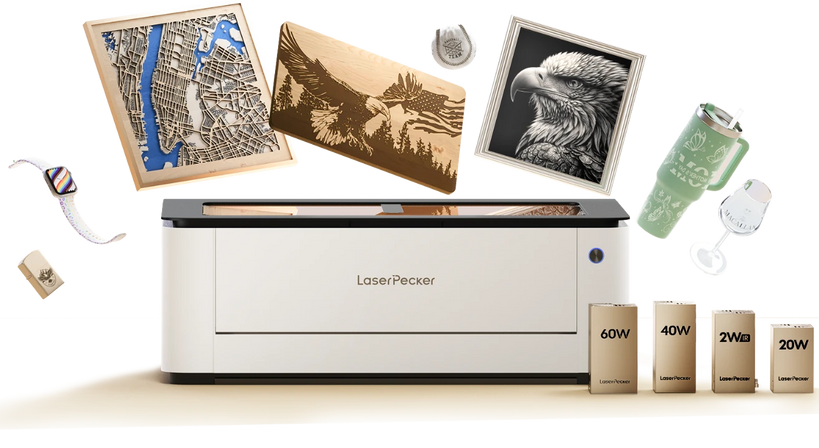
LaserPecker LX2 – A Large-Format Laser Cutter for Wood Projects
The LaserPecker LX2 is designed for users who need a larger working area, higher diode-laser power, camera-assisted positioning, and an enclosed desktop workflow. Its 500 × 305 mm working area accommodates larger signs, panels, templates, and batch layouts.
- Multiple laser options: Choose from 20W, 40W, or 60W blue diode modules and a 2W infrared module according to the material and project.
- Large working area: Process larger boards or arrange multiple smaller products in one batch.
- Camera-assisted positioning: The built-in 12MP camera helps place designs accurately on the workpiece.
- Automatic focusing: The focusing system simplifies setup across compatible materials and workpiece heights.
- Fast motion system: The machine supports speeds of up to 1,000 mm/s and acceleration of up to 10,000 mm/s².
- Enclosed design: The Class 1 enclosure provides a more integrated workflow for workshops and production spaces when operated as instructed.
The LX2 is a stronger choice for large wooden signs, batch production, thicker cutting tasks, and businesses that need a scalable desktop woodworking engraver.
Type 2: Wood Engraving Hand Tools
Traditional hand tools remove wood through controlled cuts rather than heat or high-speed rotation. They provide direct feedback, variable depth, and a hand-carved finish, making them suitable for lettering, relief carving, restoration, and decorative woodworking.
Chisels
Wood chisels generally have a straight cutting edge and are used to remove material, define outlines, flatten recessed areas, and produce clean geometric cuts. They can be pushed by hand for controlled details or used with a suitable mallet when more material must be removed.
A sharp edge is essential. A dull chisel requires more force and is more likely to slip, crush the wood fibers, or leave an uneven surface.

Gouges
Gouges have curved cutting edges that remove rounded channels or wider areas of wood. Shallow sweeps are useful for gentle contours and smoothing, while deeper gouges create pronounced grooves and recessed details. They are commonly used for reliefs, sculptural carving, lettering, and decorative patterns.

Veiners
Veiners are narrow, deep U-shaped gouges designed to cut fine channels. They are useful for leaf veins, hair, feathers, outlines, and other small textural details. Because they remove material in a narrow path, they are usually used for detail work rather than rough shaping.

Comparison Table: Common Wood Engraving Hand Tools
| Tool Type | Cutting Edge | Main Strength | Best Uses |
|---|---|---|---|
| Chisel | Straight and flat | Clean edges and flat recesses | Lettering, outlines, joinery, and geometric details |
| Gouge | Curved or U-shaped | Curves, contours, and material removal | Relief carving, shaping, and decorative patterns |
| Veiner | Narrow, deep U-shape | Fine channels and textures | Leaf veins, hair, feathers, and small details |
When to choose hand tools:
Choose hand tools when engraving depth, tactile texture, traditional craftsmanship, or direct control is more important than speed. A small chisel-and-gouge set can also be one of the most practical wood engraving tools for beginners, provided that the tools are kept sharp and used with proper cutting technique.
Type 3: Electric or Power Wood Engraving Tools
Power tools remove wood faster than traditional hand tools while still allowing the operator to guide the cut. They are useful for harder woods, larger projects, repeated shaping, and users who want to reduce the physical effort required for manual carving.
Power Chisels
A power chisel uses a motorized reciprocating or oscillating action to drive a compatible carving blade. It can speed up relief carving and material removal while retaining a cutting action similar to a hand chisel. Blade type, stroke rate, tool weight, and vibration should be considered when comparing models.

Power Routers
A handheld router uses interchangeable rotating bits to cut grooves, recesses, lettering, edges, and inlays. Adjustable depth and guide accessories make it suitable for controlled woodworking, although freehand engraving requires practice. Templates, edge guides, and suitable clamping can improve consistency and control.
Rotary Tool Kits
A rotary tool is a compact, high-speed power tool that accepts carving burrs, engraving cutters, sanding drums, and other accessories. It is especially useful for small objects, curved surfaces, fine shaping, and areas that are difficult to reach with a larger router.
Variable speed and a flexible-shaft attachment can make a rotary tool easier to control during detailed work. For beginners, it is usually best to practice on a flat scrap piece, use light pressure, and select a bit designed for the type of wood and cut.

Comparison Table: Power Wood Engraving Tools
| Tool Type | Key Feature | Common Applications | Dust Control |
|---|---|---|---|
| Power Chisel | Motor-driven cutting stroke | Relief carving, shaping, and material removal | Usually limited; use external extraction where appropriate |
| Power Router | Interchangeable bits and adjustable depth | Grooves, lettering, recesses, edging, and inlays | Many models support a dust port |
| Rotary Tool Kit | Compact body, variable speed, and multiple bits | Fine engraving, shaping, sanding, and small cuts | External extraction may be required |
When to choose power tools:
Choose power tools when you want more speed than hand carving provides but still prefer to guide the tool directly. Rotary tools are particularly accessible for small projects, while routers and power chisels are better suited to deeper cuts and faster material removal.
Type 4: CNC Wood Routers
A CNC router is a computer-controlled machine that moves a rotating cutting bit along programmed paths. Depending on the machine, tooling, and software, it can create lettering, pockets, reliefs, inlays, repeated parts, and three-dimensional woodworking designs.

Main advantages:
- Produces repeatable dimensions, depths, and toolpaths.
- Supports deep carving, pockets, inlays, and three-dimensional reliefs.
- Handles larger workpieces and batch production when properly configured.
- Works with different bits for roughing, finishing, lettering, and detail work.
Things to consider:
- The machine may require substantial workspace, fixturing, and dust collection.
- Users must learn design, CAM, toolpath, feed-rate, and bit-selection fundamentals.
- Cutting bits wear over time and must be inspected and replaced as needed.
- Purchase price and setup requirements are generally higher than those of basic hand or rotary tools.
When to choose a CNC router:
Choose a CNC router when you need deep material removal, controlled engraving depth, three-dimensional relief work, or repeatable production on larger wooden workpieces.
Part 3: How to Choose the Best Wood Engraving Tool
To choose the best tool, consider the design, required depth, workpiece size, production quantity, wood type, workspace, and your level of experience. The following comparisons can help narrow down the options.
1. Choose by the Desired Finish
- Laser engraver: Best for detailed surface graphics, photographs, fine text, logos, and repeatable personalization.
- Hand tools: Best for traditional carving, visible tool marks, variable depth, and tactile texture.
- Rotary or power tools: Best for freehand shaping, grooves, small three-dimensional details, and faster manual work.
- CNC router: Best for controlled depth, pockets, inlays, reliefs, and repeated machined parts.
2. Choose by Project Size and Quantity
For a single small ornament or practice piece, hand tools or a rotary tool may be sufficient. A compact laser engraver is more efficient for detailed personalization and repeated small products. Large signs, panels, or batch layouts require a machine with a larger working area, while high-volume relief carving may justify a CNC router.
3. Choose by Skill Level
Some of the best wood engraving tools for beginners are a small carving set, a variable-speed rotary tool, or an entry-level laser engraver with clear software and safety instructions. Beginners should start with a flat, stable workpiece and practice on scrap wood before attempting valuable or curved objects.
4. Check the Wood and Surface
Wood species and construction affect the result. Fine, even-grained wood generally makes detail easier to control, while pronounced grain, knots, resin, coatings, and glue layers can produce inconsistent cuts or engraving contrast. Always identify the material and confirm that it is suitable for the selected process.
5. Consider Workspace and Safety
Hand and power tools require secure clamping, sharp or rotating-tool precautions, and suitable dust control. Laser engravers require appropriate guarding, ventilation or filtration, fire precautions, and compatible materials. CNC routers usually require more floor or bench space, stronger workholding, and higher-capacity dust collection.
6. Compare the Total Cost
Do not compare only the initial tool price. Depending on the method, additional costs may include carving blades, engraving bits, sharpening supplies, clamps, software, ventilation, filtration, safety equipment, replacement parts, and maintenance.
Pro Tip
You do not always need to limit a project to one method. For example, you can use a laser engraver to place an accurate outline or detailed graphic, then add depth and texture with chisels, gouges, or rotary bits.
Part 4: FAQs About Wood Engraving Tools
Q1. What is the best tool for engraving wood?
The best tool depends on the desired result. A laser engraver is generally best for fine graphics, photographs, small text, and repeatable designs. Chisels and gouges are better for traditional carving and deeper texture, while a rotary tool is useful for freehand details. A CNC router is usually the strongest option for controlled-depth reliefs and repeated production.
Q2. What wood engraving tools are best for beginners?
Beginners can start with a small carving set, a variable-speed rotary tool, or a compact laser engraver with clear operating and safety instructions. Hand tools teach cutting control, rotary tools are flexible and relatively accessible, and laser engravers simplify the reproduction of digital designs. Whichever method you choose, begin with a flat piece of scrap wood.
Q3. Can you engrave wood with a rotary tool?
Yes. A rotary tool fitted with a compatible engraving cutter or carving burr can create lettering, grooves, textures, and small decorative designs in wood. Use light pressure, secure the workpiece, select the correct speed and bit, and practice on scrap material first.
Q4. Is a laser engraver or rotary tool better for wood?
A laser engraver is better for detailed digital artwork, photographs, consistent lettering, and repeated products. A rotary tool is better for freehand work, curved surfaces, deeper grooves, and manually controlled texture. A laser is usually faster for repeated surface designs, while a rotary tool provides more direct control over depth and shape.
Q5. What type of laser is best for engraving wood?
Blue diode and CO2 lasers are commonly used for wood. Diode lasers are popular for compact desktop engraving and light cutting, while CO2 lasers are often selected for larger enclosed machines and higher-throughput cutting. The right option depends on the work area, required power, wood type, material thickness, ventilation, and budget.
Q6. What is the best wood for engraving?
Fine, even-grained woods such as basswood, maple, cherry, alder, and some types of plywood are commonly chosen for engraving. However, results vary by grain, density, resin content, moisture, glue, veneer, and surface finish. Test the actual material before processing the final project.
Q7. How do you prevent burn marks when laser engraving wood?
Use tested power and speed settings, maintain correct focus, keep the surface clean, and use suitable air movement or extraction. Masking the surface can reduce smoke staining on some woods. Because different species react differently, test the settings and masking material on a spare piece first.
Conclusion
The best wood engraving tools are the ones that match the finish, depth, scale, and production needs of your project. Chisels and gouges provide traditional texture and direct control. Rotary tools offer an accessible way to create freehand details, while CNC routers are better suited to deep, repeatable machining.
For detailed digital designs and personalized wooden products, the LaserPecker LP4 offers a compact and portable engraving workflow. For larger signs, batch layouts, and higher-power wood projects, the LaserPecker LX2 provides a larger working area and more scalable production capabilities.
Before choosing a tool, compare the required engraving depth, workpiece dimensions, wood construction, workspace, safety requirements, and total operating cost. Testing the process on scrap material will also help you achieve cleaner and more consistent results.


