


A custom cake topper is one of the easiest ways to make a cake stand out at birthdays, weddings, baby showers, anniversaries, and other special events. With laser cutting, you can create personalized designs featuring names, dates, messages, monograms, and decorative patterns with exceptional precision.
Whether you're looking for a professional-quality laser cut cake topper or want to learn how to make a cake topper yourself, laser cutting offers cleaner edges, finer details, and more design flexibility than traditional crafting methods.
In this guide, you'll discover the best materials for laser-cut cake toppers, learn how to make cake toppers step by step, compare laser cutting with other methods, and find the right laser cutter for your projects.

In this article:
Part 1: Materials and Tools Needed for a Laser Cut Cake Topper
Before learning how to make a cake topper with a laser cutter, you'll need the right materials and equipment. Choosing suitable materials helps ensure clean cuts, durable designs, and a professional-looking finished product.
Best Materials for a Laser Cut Cake Topper
The most popular materials for cake toppers are acrylic and wood. Both are lightweight, easy to customize, and suitable for creating personalized designs.
Acrylic
Acrylic is a popular choice for modern cake toppers because it is available in a wide range of colors and finishes, including clear, mirror, glitter, and matte options.
- Lightweight and durable
- Available in many colors and styles
- Easy to clean and reuse
- Perfect for detailed lettering and intricate designs

Wood
Wood cake toppers offer a warm and natural appearance that works well for weddings, rustic celebrations, and vintage-themed events.
- Natural and elegant finish
- Easy to paint, stain, or engrave
- Suitable for layered designs
- Popular for DIY cake topper projects

For most projects, 2–4mm acrylic or 3mm basswood plywood provides the ideal balance between durability and weight.
Essential Tools You'll Need
- Laser Cutter: Used to cut and engrave the topper design with precision.
- Design Software: Programs such as LightBurn, Adobe Illustrator, CorelDRAW, or LaserPecker Design Space allow you to create vector artwork.
- Safety Equipment: Laser safety glasses and proper ventilation are essential when operating a laser cutter.
- Honeycomb Panel or Clamps: Helps keep materials flat and stable during cutting.
- Finishing Tools: Sandpaper, polishing cloths, paint, or stain can be used to enhance the final appearance.
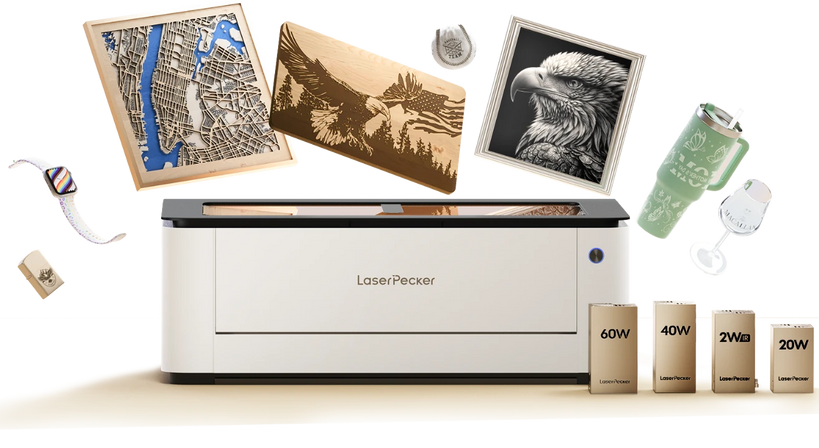
Recommended Laser Cutter for Cake Toppers: LaserPecker LX2
The LaserPecker LX2 is a powerful desktop laser cutter designed for creating custom cake toppers, acrylic decorations, wooden toppers, party signs, and personalized event crafts.
With its high-power laser modules, precise cutting control, and spacious working area, the LX2 helps users create clean, detailed, and repeatable cake topper designs for birthdays, weddings, baby showers, and business orders.
-
Up to 60W High-Power Diode Laser
The LX2 supports 20W, 40W, and 60W laser modules, providing strong cutting capability for acrylic, wood, MDF, and other cake topper materials. -
Precise Cutting for Intricate Topper Designs
The LX2 can cut detailed names, numbers, script fonts, silhouettes, and decorative patterns with clean edges and accurate shapes. -
Large Working Area for Bigger Decorations
The spacious workspace allows users to create larger cake toppers or cut multiple topper pieces in one session for higher production efficiency. -
Camera-Assisted Alignment for Better Accuracy
The built-in camera system helps align materials and designs more accurately, reducing placement errors and improving repeatable cutting results.
Part 2: How to Laser Cut Cake Topper (Step-by-Step)
Now that you have your materials and tools ready, it's time to create your own laser cut cake topper. Whether you're making a birthday topper, wedding decoration, or personalized party accessory, the process is straightforward when broken into a few simple steps.
Step 1: Create Your Cake Topper Design
Start by designing your topper in vector-based software such as LightBurn, Adobe Illustrator, CorelDRAW, or LaserPecker Design Space.
Popular cake topper designs include:
- Names and initials
- "Happy Birthday" text
- Wedding monograms
- Anniversary dates
- Floral and decorative elements
- Stars, hearts, and themed graphics
Be sure to include a stem or support base that will hold the topper securely in the cake.
Once finished, save your design as an SVG, AI, or DXF file for laser cutting.
Step 2: Choose and Prepare Your Material
Select acrylic or wood based on your desired style.
- Acrylic: Ideal for modern, colorful, and elegant cake toppers.
- Wood: Perfect for rustic, natural, or vintage-themed celebrations.
Before cutting, remove any protective film from acrylic and lightly clean or sand wooden sheets if necessary. Place the material flat on the laser bed and secure it with clamps if needed.
Step 3: Configure Your Laser Cutter
Adjust the laser power, speed, and focus settings according to the material type and thickness.
For the best results:
- Run a small test cut on scrap material first.
- Verify that all lines are set correctly for cutting or engraving.
- Check alignment before starting the final project.
Taking a few minutes to test your settings can prevent wasted material and improve cut quality.
Step 4: Engrave Before Cutting
If your design includes decorative details, names, dates, or patterns, engrave them first.
Engraving before cutting helps maintain accurate positioning and prevents the material from shifting during the process.
This step is especially useful for wedding monograms, personalized messages, and detailed artwork.
Step 5: Cut the Cake Topper
Once engraving is complete, run the cutting operation to create the final shape.
A laser cutter can produce smooth edges and precise details that are difficult to achieve with scissors, craft knives, or manual cutting tools.
After cutting, carefully remove the topper from the laser bed.
Step 6: Finish and Customize
Complete your DIY cake topper by cleaning the surface and adding any finishing touches.
Depending on the material, you may want to:
- Remove protective film from acrylic
- Lightly sand wooden edges
- Apply paint or stain
- Add glitter or decorative accents
- Polish acrylic for extra shine
Your custom laser cut cake topper is now ready to display on your cake.
With practice, you can create everything from simple name toppers to intricate layered designs for weddings, birthdays, baby showers, and other special events.
DIY cake toppers are often made with tools like Cricut or by hand. But laser cutting? It just has some real pluses:
Part 3: FAQs About Laser Cut Cake Toppers
1. What Is the Best Material for a Laser Cut Cake Topper?
The best material depends on the look you want to achieve.
- Acrylic: Lightweight, durable, and available in a variety of colors and finishes.
- Wood: Offers a natural, rustic appearance and can be painted, stained, or engraved.
Acrylic is often preferred for modern and elegant designs, while wood is popular for weddings and rustic-themed celebrations.
2. Are Laser Cut Cake Toppers Food Safe?
Yes, as long as food-safe materials are used and the topper is properly cleaned before use.
For added safety, many people cover the stem with food-safe tape or insert it into a straw before placing it into the cake.
3. What Thickness Is Best for Cake Toppers?
For most projects, materials between 2mm and 4mm thick provide the best balance of strength and appearance.
- 2–3mm Acrylic: Great for detailed and lightweight designs.
- 3mm Wood: A common choice for laser-cut wooden toppers.
- 4mm Materials: Recommended for larger toppers that need additional support.
4. Can I Add Small Details and Intricate Designs?
Yes. One of the biggest advantages of laser cutting is its ability to produce fine details with high precision.
You can create intricate lettering, floral patterns, monograms, and decorative borders that would be difficult to achieve with traditional cutting methods.
To improve durability, avoid making thin sections too narrow, especially on larger designs.
5. What File Format Should I Use for Laser Cutting?
Most laser cutters work best with vector files such as SVG, DXF, AI, or EPS.
Vector artwork allows the laser cutter to follow precise paths, producing cleaner cuts and more accurate results.
Conclusion
Creating a laser cut cake topper is an easy way to add a personal touch to birthdays, weddings, and other special events. With the right materials, a simple design, and a laser cutter, you can create professional-looking toppers that are both durable and unique. Start with a simple project, experiment with different materials, and you'll soon be creating custom cake toppers for any occasion.