


Garden stakes are useful for supporting plants, labeling flowers, and adding decorative elements to outdoor spaces. Depending on your tools, materials, and design preferences, there are several ways to make custom garden stakes at home.
Some methods use traditional woodworking tools, while others rely on modern technologies such as 3D printers and laser cutters for more precise and customized results.
In this guide, we will explore three practical methods for making garden stakes and compare their tools, processes, and advantages.

In this article:
- Method 1: Make a Garden Stake with Electric Tools
- Method 2: Make a Garden Stake with a 3D Printer
- Method 3: Make a Garden Stake with a Laser Cutter
- FAQs: Hot Questions about Making a Garden Stake
Method 1: Make a Garden Stake with Electric Tools
Using electric tools is one of the fastest and most practical ways to make wooden garden stakes. This method is suitable for plant markers, garden signs, decorative yard stakes, and outdoor labeling projects.
Electric tools such as saws, sanders, and drills help speed up the cutting and shaping process while improving consistency and accuracy. This method works well for both simple DIY projects and larger batches of garden stakes.
Materials and Tools Needed
- Wood boards, wood strips, or dowels
- Jigsaw, circular saw, or miter saw
- Orbital sander or belt sander
- Drill or rotary tool (optional)
- Measuring tape
- Pencil and ruler
- Paint, stain, or outdoor wood sealant
- Safety glasses and hearing protection
Steps to Make a Garden Stake with Electric Tools
- Plan the Garden Stake Design: Decide the size, shape, and purpose of the garden stake, such as plant labels, decorative signs, or garden markers.
- Cut the Wood Pieces: Use a jigsaw, circular saw, or miter saw to cut the wood into the desired stake shape and sharpen the bottom end if needed.
- Shape and Smooth the Surface: Use a sander to smooth rough edges and refine the shape of the garden stake.
- Add Decorative Details: Drill holes, carve simple patterns, or paint labels and designs onto the garden stake surface.
- Apply Protective Finish: Add paint, stain, or outdoor sealant to improve durability and weather resistance.
- Install the Garden Stake: Place the finished stake into soil, flower beds, or garden containers.
Pros and Cons of Making a Garden Stake with Electric Tools
Pros: Faster production, cleaner cuts, suitable for larger projects, and easier shaping compared with hand tools.
Cons: Requires power tools, creates dust and noise, and may need additional finishing for detailed decorative work.
Method 2: Make a Garden Stake with a 3D Printer
A 3D printer is a modern and flexible way to make custom garden stakes. Instead of cutting wood manually, a 3D printer builds the stake layer by layer using digital 3D models, allowing for highly customized shapes and detailed designs.
This method is ideal for personalized plant labels, decorative garden markers, themed garden signs, and creative outdoor decorations. 3D printing also makes it easy to create complex shapes, text, and repeated designs with minimal manual work.
Materials and Tools Needed
- 3D printer
- PLA, PETG, or outdoor-resistant filament
- 3D modeling software or STL design files
- Slicer software
- Sandpaper or deburring tools (optional)
- Paint or UV-resistant coating (optional)
- Protective gloves and safety glasses
Steps to Make a Garden Stake with a 3D Printer
- Create or Download a Design: Design the garden stake using 3D modeling software or download an STL file for plant markers or decorative stakes.
- Prepare the Print File: Import the model into slicer software and adjust print settings such as layer height, infill, and print speed.
- Load the Filament: Install the filament into the 3D printer and ensure the print bed is leveled properly.
- Start the 3D Printing Process: Print the garden stake and monitor the first layers to ensure proper adhesion.
- Remove and Clean the Print: Remove the finished garden stake from the print bed and trim away any support material if necessary.
- Apply Optional Finishing: Sand, paint, or coat the stake to improve appearance and weather resistance for outdoor use.
- Install the Garden Stake: Place the finished stake into soil, flower pots, or garden beds.
Pros and Cons of Making a Garden Stake with a 3D Printer
Pros: Highly customizable, ideal for detailed shapes and text, repeatable production, and minimal material waste.
Cons: Slower production speed, requires 3D modeling knowledge, and some filaments may not handle long-term outdoor exposure well.
Method 3: Make a Garden Stake with a Laser Cutter
Laser cutting is one of the most precise and efficient ways to make custom garden stakes. Instead of manually shaping materials, a laser cutter follows a digital design file to create clean edges, detailed engravings, and highly consistent results.
This method is ideal for plant markers, decorative garden signs, personalized outdoor labels, and small-batch production projects. Laser cutting also allows makers to quickly create detailed text, logos, and decorative patterns with minimal manual finishing.
Materials and Tools Needed
- Laser cutter
- Plywood, basswood, acrylic, or MDF sheets
- Vector design software
- Paint, stain, or outdoor sealant
- Sandpaper
- Ventilation system or air assist
- Protective glasses and mask
Steps to Make a Garden Stake with a Laser Cutter
- Create the Garden Stake Design: Design the stake shape, text, logos, or decorative artwork using vector software such as SVG or DXF format.
- Prepare the Material: Place the wood or acrylic sheet onto the laser cutter bed and ensure the material is flat and properly aligned.
- Adjust the Laser Settings: Configure the laser power, speed, and pass settings according to the material type and thickness.
- Cut and Engrave the Stake: Start the laser cutting process to cut the garden stake shape and engrave names, labels, or decorative designs.
- Clean and Finish the Surface: Remove residue, lightly sand the edges if needed, and apply paint, stain, or outdoor sealant for better durability.
- Install the Garden Stake: Insert the finished stake into flower pots, garden beds, or outdoor soil areas.
Pros and Cons of Making a Garden Stake with a Laser Cutter
Pros: High precision, detailed engraving capability, fast repeat production, and excellent customization options.
Cons: Requires a laser cutter and design software, limited by material thickness, and may leave slight burn marks on wood edges.
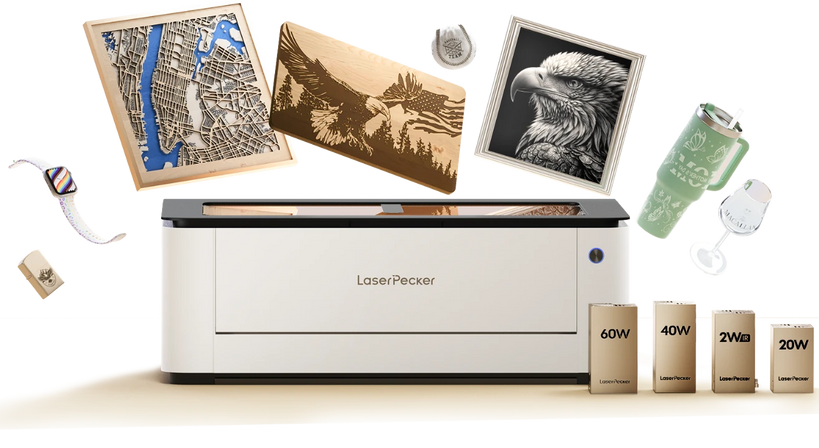
Recommended Laser Cutter for Garden Stake Projects: LaserPecker LX2
The LaserPecker LX2 is designed for makers who need precise cutting, detailed engraving, and efficient production for garden stake projects and outdoor decorative crafts.
-
500 × 305 mm (19.7" × 12") Large Working Area
The spacious workspace allows multiple garden stakes or larger decorative signs to be processed in a single run. -
20W / 40W / 60W Interchangeable Diode Laser Modules
Modular laser options provide flexible cutting and engraving capability for wood, acrylic, and outdoor signage materials. -
Up to 1000 mm/s Processing Speed
High-speed engraving and cutting improve efficiency for batch production and custom garden projects. -
0.01 mm Positioning Precision
High positioning accuracy helps create cleaner outlines, sharper text, and more consistent engraving results. -
12 MP Camera Positioning System
The built-in camera system improves material alignment and simplifies precise engraving placement. -
Supports LightBurn and LPDS Software
Compatible with both LightBurn and LaserPecker Design Space for flexible vector design workflow and project management. -
Wide Material Compatibility
Supports wood, acrylic, leather, coated metal, cardboard, and many other maker materials for various outdoor craft applications.
FAQs: Hot Questions about Making a Garden Stake
Q1: What Can I Use as a Plant Stake?
Garden stakes can be made from many different materials, including wood, bamboo, metal rods, and plastic stakes.
Wood and bamboo are among the most popular choices for DIY garden stakes because they are easy to cut, shape, and install in outdoor soil.
Q2: How Tall Should a Garden Stake Be?
The ideal height depends on the type and size of the plant being supported.
In general, the stake should extend above the plant while leaving enough length to be buried securely in the soil. A common recommendation is to place about one-third of the stake underground for better stability.
Q3: Can I Make Garden Stakes Without Power Tools?
Yes, garden stakes can be made using simple hand tools such as a hand saw, knife, or sandpaper.
Basic wooden or bamboo stakes are beginner-friendly projects and do not necessarily require electric tools or advanced woodworking equipment.
Q4: Are Bamboo Stakes Better Than Wooden Stakes?
Bamboo stakes are lightweight, naturally weather-resistant, and environmentally friendly, making them a popular option for gardening.
Wooden stakes often provide more flexibility for customization, shaping, painting, and engraving. Their durability also depends on the wood type and protective treatment used.
Q5: Can You Use Chopsticks as Plant Stakes?
Yes, chopsticks can work as temporary stakes for very small plants, seedlings, or indoor plants.
However, they are generally not strong enough for larger or heavier plants because they can bend or break under pressure. They are best suited for lightweight and short-term support applications.
Conclusion
Making garden stakes can be a simple DIY project or a more advanced creative process depending on the tools and materials you choose.
Traditional electric tools are practical for basic wooden stakes, while 3D printers and laser cutters offer more customization, precision, and repeatable production.
Whether you are creating plant labels, decorative garden signs, or outdoor markers, choosing the right method will help you achieve cleaner results and a more efficient workflow.