


Wooden crosses are popular for home decoration, church crafts, memorial projects, and handmade gifts. Depending on your tools and woodworking experience, there are several ways to make a wooden cross.
Some methods use simple hand tools, while others rely on CNC machines or laser cutters for more precise cutting and engraving.
In this guide, we will explore three common methods for making a wooden cross and compare their tools, processes, and advantages.

In this article:
- Method 1: Make a Wooden Cross with a Table Saw
- Method 2: Make a Wooden Cross with a CNC Machine
- Method 3: Make a Wooden Cross with Laser Cutter
- FAQs: Hot Questions about Making a Wooden Cross
Method 1: Make a Wooden Cross with a Table Saw
Using a table saw is one of the most efficient ways to make a wooden cross with straight cuts and clean edges. This method is suitable for wall decorations, church crafts, memorial projects, outdoor crosses, and handmade gifts.
A table saw allows you to accurately cut wood pieces to consistent dimensions, making the assembly process faster and more precise than manual sawing. This method works well for both simple and larger wooden cross projects.
Materials and Tools Needed
- Wood boards or lumber
- Table saw
- Measuring tape
- Pencil and square ruler
- Wood glue or screws
- Wood clamps
- Sandpaper or orbital sander
- Wood stain, paint, or finish
- Safety glasses and hearing protection
Steps to Make a Wooden Cross with a Table Saw
- Measure and Mark the Wood: Decide the dimensions of the wooden cross and mark the vertical and horizontal pieces on the wood boards.
- Cut the Wood Pieces: Use the table saw to cut the wood pieces to the required lengths with straight and accurate edges.
- Sand the Surfaces: Smooth rough edges and surfaces using sandpaper or a sander before assembly.
- Assemble the Cross: Position the shorter horizontal beam across the longer vertical beam and secure them using wood glue, screws, or nails.
- Clamp and Let Dry: Use clamps to hold the pieces in place while the adhesive dries if glue is used.
- Apply Final Finish: Paint, stain, or seal the wooden cross to improve appearance and protect the wood surface.
Pros and Cons of Making a Wooden Cross with a Table Saw
Pros: Fast cutting, clean straight edges, accurate sizing, and suitable for larger wood pieces.
Cons: Requires a table saw, limited for curved or decorative shapes, and proper safety precautions are necessary.
Method 2: Make a Wooden Cross with a CNC Machine
A CNC machine is a precise and efficient way to make wooden crosses with detailed shapes and consistent dimensions. Unlike manual cutting methods, CNC routers follow digital design files to automatically cut and carve the wood with high accuracy.
This method is ideal for decorative wall crosses, church crafts, memorial plaques, custom engraved crosses, and batch production projects. CNC cutting also allows more complex patterns and smoother curves that are difficult to achieve by hand.
Materials and Tools Needed
- CNC router machine
- Plywood, MDF, or solid wood board
- CAD or vector design software
- CNC control software
- Router bits
- Wood clamps or vacuum table
- Sandpaper or orbital sander
- Wood stain, paint, or finish
- Safety glasses and hearing protection
Steps to Make a Wooden Crate with a CNC Machine
- Create the Crate Design: Design the crate panels, joints, handles, and dimensions using CAD or vector software.
- Prepare the Wood Material: Secure the plywood or wood board onto the CNC worktable using clamps or hold-down fixtures.
- Set Up the CNC Toolpath: Import the design file into CNC software and configure cutting depth, feed rate, and router bit settings.
- Cut the Crate Parts: Run the CNC machine to automatically cut the crate panels, slots, and decorative details.
- Sand the Edges and Surfaces: Smooth rough edges and remove any cutting marks using sandpaper or a sander.
- Assemble the Wooden Crate: Connect the crate panels using wood glue, screws, or interlocking joints depending on the design.
- Apply Final Finish: Paint, stain, or seal the wooden crate to improve appearance and protect the wood surface.
Pros and Cons of Making a Wooden Crate with a CNC Machine
Pros: High cutting precision, repeatable production, cleaner joints, and excellent customization capability.
Cons: Higher equipment cost, requires CNC software knowledge, and setup can be more complex for beginners.
Method 3: Make a Wooden Cross with a Laser Cutter
Laser cutting is a modern and highly precise way to make wooden crosses. Instead of manually cutting the wood, a laser cutter follows a digital design file to create clean outlines, detailed engravings, and accurate shapes with minimal manual effort.
This method is ideal for decorative wall crosses, church signs, memorial crafts, layered cross designs, and personalized engraved projects. Laser cutting also makes it easier to reproduce the same design consistently for batch production or small business applications.
Materials and Tools Needed
- Laser cutter
- Plywood, basswood, or MDF sheets
- Vector design software
- Wood glue (optional for layered designs)
- Sandpaper
- Paint, stain, or wood finish
- Ventilation system or air assist
- Protective glasses and mask
Steps to Make a Wooden Cross with a Laser Cutter
- Create the Cross Design: Design the cross outline and engraving details using vector software such as SVG or DXF format.
- Prepare the Wood Material: Place the plywood or wood sheet onto the laser cutter bed and ensure the material is flat and secure.
- Adjust the Laser Settings: Set the laser power, speed, and pass settings based on the wood type and thickness.
- Cut and Engrave the Cross: Start the laser cutting process to cut the cross shape and engrave decorative text, patterns, or religious symbols if desired.
- Assemble Layered Parts (Optional): Glue multiple wooden layers together if creating a thicker or dimensional cross design.
- Sand and Finish the Surface: Smooth the edges with sandpaper and apply paint, stain, or clear coating to complete the project.
Pros and Cons of Making a Wooden Cross with a Laser Cutter
Pros: High precision, clean edges, detailed engraving capability, and efficient repeat production.
Cons: Requires a laser cutter and design software, limited by material thickness, and may leave slight burn marks on wood edges.
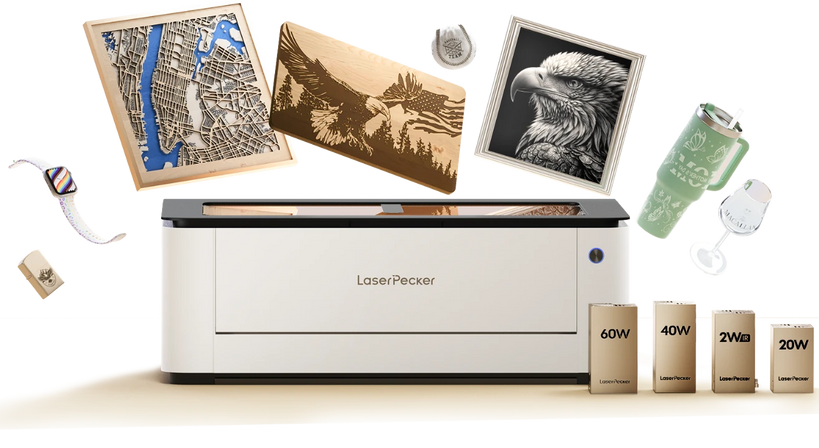
Recommended Laser Cutter for Wooden Cross Projects: LaserPecker LX2
The LaserPecker LX2 is designed for makers who need precise cutting, detailed engraving, and larger workspace support for wooden cross projects and decorative wood crafts.
-
Large 500 × 305 mm (19.7" × 12") Working Area
Allows larger cross designs and multiple wooden parts to be processed in a single run. -
Up to 60W Diode Laser Power
Supports interchangeable 20W, 40W and 60W laser modules for stronger cutting capability on plywood, basswood, and MDF materials. -
High-Speed Processing up to 1000 mm/s
Improves engraving and cutting efficiency for decorative cross projects and repeat production. -
Up to 22 mm Wood Cutting Capability
The 40W module can cut thicker wood materials suitable for layered and dimensional wooden cross structures. -
0.01 mm Positioning Precision
High positioning accuracy helps create cleaner outlines, sharper engravings, and better assembly consistency. -
12 MP Camera Positioning System
Built-in camera improves material alignment and simplifies accurate engraving placement.
FAQs About Making a Wooden Cross
Q1: What Wood Is Best for a Wooden Cross?
The best wood depends on your project goals and skill level. Pine wood is a popular choice for beginners because it is affordable, lightweight, and easy to work with.
For more durable and premium-looking wooden crosses, hardwoods such as oak, maple, or walnut are commonly used. Plywood is also a popular option for CNC and laser cutting projects because of its smooth surface and stable structure.
Q2: How Thick Should Wood Be for a Wooden Cross?
Wooden crosses are commonly made using wood between 1/4 inch and 1 inch thick, depending on the size and intended use.
Thin wood works well for lightweight wall decorations, while thicker wood provides better strength and stability for larger or freestanding crosses. Medium-thickness wood is often preferred for engraving projects.
Q3: Can Beginners Make a Wooden Cross?
Yes, making a wooden cross is generally considered a beginner-friendly woodworking project, especially when using simple designs and basic tools.
Softwood and straight cuts help simplify the process for beginners. As skills improve, makers can explore more advanced methods such as CNC routing or laser cutting.
Q4: What Is the Ratio for Making a Cross?
A common cross proportion uses a vertical beam that is approximately twice the length of the horizontal beam.
The horizontal section is usually placed slightly above the midpoint of the vertical beam. However, the exact proportions can be adjusted based on personal preference and design style.
Q5: How Big Should a Wooden Cross Be?
The ideal size depends on where the cross will be displayed and its intended purpose.
Small wooden crosses are often used as gifts or ornaments, medium-sized crosses are commonly used for wall decorations, and larger crosses are suitable for outdoor displays or church installations.
Q6: Can You Engrave a Wooden Cross with a Laser?
Yes, laser engraving is one of the most effective ways to add detailed text, patterns, symbols, or personalized designs to a wooden cross.
Laser engraving creates clean and precise results while minimizing damage to the wood surface. It is commonly used for adding names, dates, religious symbols, and decorative artwork.
Conclusion
Making a wooden cross can be a simple beginner woodworking project or a more advanced fabrication process depending on the tools you use.
Traditional saw methods are affordable and beginner-friendly, while CNC machines and laser cutters offer cleaner cuts, higher precision, and easier customization.
Whether you are creating a wooden cross for decoration, gifting, or personal projects, choosing the right method will help you achieve better results and a smoother building process.