


Custom foam inserts are one of the most effective ways to protect, organize, and present tools, electronics, collectibles, photography equipment, and other valuable items. By creating dedicated cutouts for each item, foam inserts help prevent movement, reduce damage during transport, and give storage cases a clean, professional appearance.
In this guide, you'll learn how to make custom foam inserts, compare three popular manufacturing methods, discover how to cut custom foam inserts accurately, and learn why laser cutting has become one of the most efficient solutions for creating professional-quality foam inserts.

In this article:
- Part 1: 3 Common Methods for Making Custom Foam Inserts
- Method 1: Laser Cutting Foam Inserts
- Method 2: Tracing and Manual Cutting (DIY Method)
- Method 3: CNC Foam Cutting
- Part 2: Why Laser Cutting Is the Best Way to Make Custom Foam Inserts
- Part 3: FAQs about Making Custom Foam Inserts
Part 1: 3 Common Methods for Making Custom Foam Inserts
There are several ways to create custom foam inserts, ranging from simple DIY techniques to advanced manufacturing methods. The best approach depends on your budget, required precision, available tools, and the number of inserts you need to produce.
Method 1: Laser Cutting Foam Inserts
Laser cutting is widely considered the most precise and efficient method for creating custom foam inserts. Using a focused laser beam, the laser cutter machine cuts foam with exceptional accuracy, producing clean edges, smooth curves, and highly detailed layouts that are difficult to achieve with manual tools or traditional cutting methods.
Method 2: Tracing and Manual Cutting (DIY Method)
Tracing and manual cutting is the traditional DIY approach to making custom foam inserts. The process involves placing an item on a foam sheet, tracing its outline, and cutting the shape using a utility knife, craft knife, hot wire cutter, or foam cutting tool.
This method is inexpensive and requires very little equipment, making it a popular option for hobbyists and occasional projects.
Method 3: CNC Foam Cutting
CNC foam cutting uses computer-controlled cutting tools to machine foam into precise shapes, cavities, and depths. Unlike manual cutting methods, CNC systems follow digital design files, allowing them to create consistent inserts with accurate dimensions and repeatable results.
This method is widely used in manufacturing, aerospace, medical equipment packaging, industrial storage, and professional tool organization where precision and consistency are critical.
For businesses producing large quantities of custom foam inserts for cases, CNC cutting can be an effective solution for repeat production.
Part 2: Why Laser Cutting Is the Best Way to Make Custom Foam Inserts
| Method | Precision | Speed | Best For |
|---|---|---|---|
| Laser Cutting Foam Inserts | Very High | Fast | Professional foam inserts, tool organization, equipment cases, repeat production |
| Tracing & Manual Cutting | Low to Medium | Slow | DIY projects, one-off foam inserts, hobby use |
| CNC Foam Cutting | High | Moderate | Industrial applications, thick foam, batch production |
To make custom foam inserts, laser cutting provides a streamlined workflow that transforms a digital design into a perfectly fitted foam insert with minimal manual effort.
Reason 1: Exceptional Precision and Clean Edges
Laser cutters follow digital design files with remarkable accuracy, allowing them to create complex shapes, tight tolerances, and smooth curves that are difficult to achieve with hand tools.
This level of precision is especially valuable when creating inserts for tools, cameras, electronics, medical equipment, and other items that require a secure fit.
Reason 2: Perfect for Custom Tool Organization
Many professionals search for how to make custom foam inserts for tools because properly fitted inserts improve organization, reduce tool loss, and make missing items immediately visible.
Laser cutting allows each tool to have its own dedicated space, creating a clean, organized layout that is both functional and professional.
Reason 3: Fast Production and Easy Repeatability
Once a design is created, laser cutting can reproduce identical inserts repeatedly without variation. This is ideal for businesses, workshops, service technicians, and manufacturers who need multiple cases with the same layout.
Compared with manual cutting, laser cutting significantly reduces production time while improving consistency.
Reason 4: Works with Multiple Foam Materials
Laser cutting is compatible with many of the most common foam materials used in protective storage systems, including:
- EVA foam
- Polyethylene foam
- Polyurethane foam
- Layered foam assemblies
This flexibility allows users to choose the ideal foam based on durability, cushioning, appearance, and budget.
In summary: If your goal is to create accurate, durable, and professional-looking foam inserts, laser cutting offers the best overall balance of quality, efficiency, and flexibility.
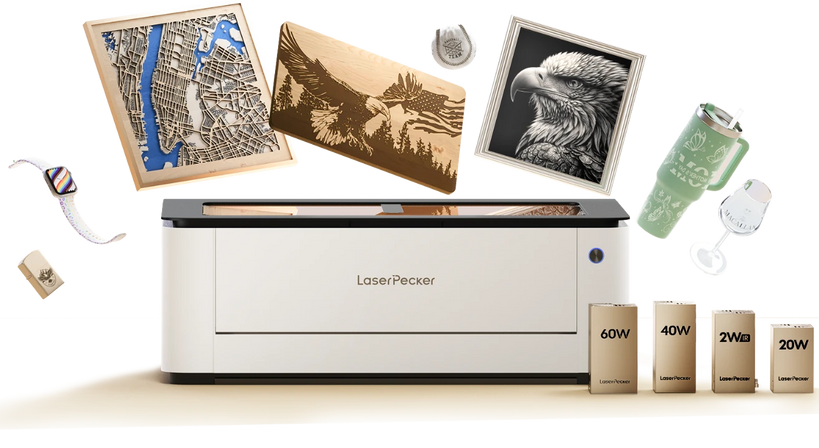
Recommended Laser Cutter for Custom Foam Inserts: LaserPecker LX2
The LaserPecker LX2 is a powerful desktop laser cutter designed for creating custom foam inserts, tool organizers, protective cases, packaging solutions, and product displays.
-
Up to 60W High-Power Diode Laser
The LX2 supports 20W, 40W, and 60W laser modules, providing strong cutting performance for EVA foam, craft foam, polyethylene foam, and other foam materials commonly used for custom inserts. -
Large 500 × 305 mm Working Area
The spacious workspace allows users to cut larger foam sheets or multiple insert components in a single session, improving production efficiency. -
12MP Camera with Point-to-Shape™ Positioning
The built-in camera system helps accurately position foam sheets and preview layouts before cutting, reducing material waste and improving workflow. -
Precise Cutting for Complex Foam Layouts
The LX2 can accurately cut tool outlines, equipment compartments, custom packaging inserts, and intricate foam shapes with clean and consistent results.
Part 3: FAQs About Custom Foam Inserts
Q1. Can You Laser Cut EVA Foam?
Yes. EVA foam is one of the most commonly used materials for laser-cut foam inserts. It offers good durability, clean cutting performance, and excellent support for tools, electronics, and storage systems. Proper laser settings and ventilation are important for achieving the best results.
Q2. How Do You Cut Custom Foam Inserts Accurately?
There are several ways to cut foam, including utility knives, hot wire cutters, CNC machines, and laser cutters. Among them, laser cutting provides the highest level of accuracy because it follows a digital design file and produces precise, repeatable results.
Q3. Are Custom Foam Inserts Worth It?
Yes. Custom foam inserts improve organization, protect valuable equipment, reduce movement during transport, and create a professional appearance. They are widely used in tool storage, photography cases, electronics protection, medical equipment packaging, and industrial applications.
Conclusion
For most hobbyists, professionals, and businesses, laser cutting offers the best balance of accuracy, speed, repeatability, and design flexibility. It makes it possible to create perfectly fitted compartments, clean edges, custom labels, and professional-looking layouts that are difficult to achieve with traditional methods.
Whether you're organizing a workshop, protecting sensitive electronics, building presentation kits, or improving equipment storage, laser-cut foam inserts provide a practical and professional solution for almost any application.