


Learning how to make a custom stamp is a great way to add a personal touch to packaging, crafts, letters, business branding, and creative projects. Instead of buying generic designs, you can create a stamp that matches your exact style and purpose.
In this guide, you'll learn how to make a stamp at home using 4 popular techniques. We'll also cover creative uses, practical tips, and answers to common questions about custom stamp making.

In this article:
- Part 1: Why Make Your Own Custom Stamp
- Part 2: Top 4 Methods to Make Custom Stamps
- Method 1: Make a Rubber Stamp with a Carving Tool
- Method 2: Make a Custom Rubber Stamp with a Cricut Machine
- Method 3: Make a Custom Stamp with a Laser Engraver
- Method 4: Make a Custom Stamp With a 3D Printer
- Part 3: Creative Uses for Custom Stamps
- FAQs Questions about Making Custom Stamps
Part 1: Why Make Your Own Custom Stamp?
Making your own custom stamp is an easy way to add a personal touch to crafts, packaging, branding, and creative projects. Whether you want to learn how to make a stamp at home for fun or business use, custom stamps give you more flexibility, creativity, and control.
- Create unique designs: Making your own custom stamp lets you personalize logos, text, artwork, packaging, and crafts exactly the way you want.
- Great for personal and business use: Custom stamps work well for branding, shipping packages, scrapbooking, invitations, classrooms, and DIY projects.
- Choose different materials: You can learn how to make a rubber stamp, wood stamp, or even a metal stamp depending on your project needs.
- Fun creative project: Stamp making is a practical hobby for artists, crafters, small business owners, and DIY enthusiasts.

Part 2: 4 Ways to Make Custom Stamps
There are several ways to make a custom stamp, ranging from simple hand carving to advanced laser engraving. Some methods are affordable and beginner-friendly, while others offer faster production and more precise results.
Below are four practical methods that show how to make a stamp at home or create professional-quality custom stamps for crafts, branding, packaging, and business use.
Method 1: Make a Rubber Stamp with a Carving Tool
If you want a simple and affordable way to make a custom stamp, hand carving is a great place to start. This traditional method is beginner-friendly and works well for small designs, logos, patterns, and creative DIY projects.
Learning how to make a rubber stamp by hand only requires a few basic tools, making it one of the easiest ways to make a stamp at home.
Tools and Materials
- Rubber carving block or eraser
- Carving tools or craft knife
- Ink pad
- Pencil and tracing paper
How to Make a Rubber Stamp with Carving Tool?
- Draw or print your stamp design.
- Transfer the design onto the rubber surface using tracing paper.
- Carefully carve away the areas you do not want to print.
- Test the stamp with ink and adjust any uneven areas.
- Smooth the edges if needed and begin stamping.
Method 2: Make a Custom Rubber Stamp with a Cricut Machine
If you already own a Cricut machine, you can use it to make custom stamps quickly and accurately. This method is popular with DIY crafters because it is faster than hand carving and works well for detailed shapes and clean designs.
Tools and Materials
- Cricut Maker or Cricut Explore
- Rubber stamp sheets
- Strong grip cutting mat
- Cutting blade
- Ink pad
How to Make a Custom Stamp With a Cricut Machine?
- Upload your design into Cricut Design Space.
- Place the rubber sheet onto the cutting mat and load it into the machine.
- Adjust the cutting depth and machine settings.
- Let the Cricut cut the stamp design.
- Attach the finished stamp to a wood or acrylic block for easier handling.
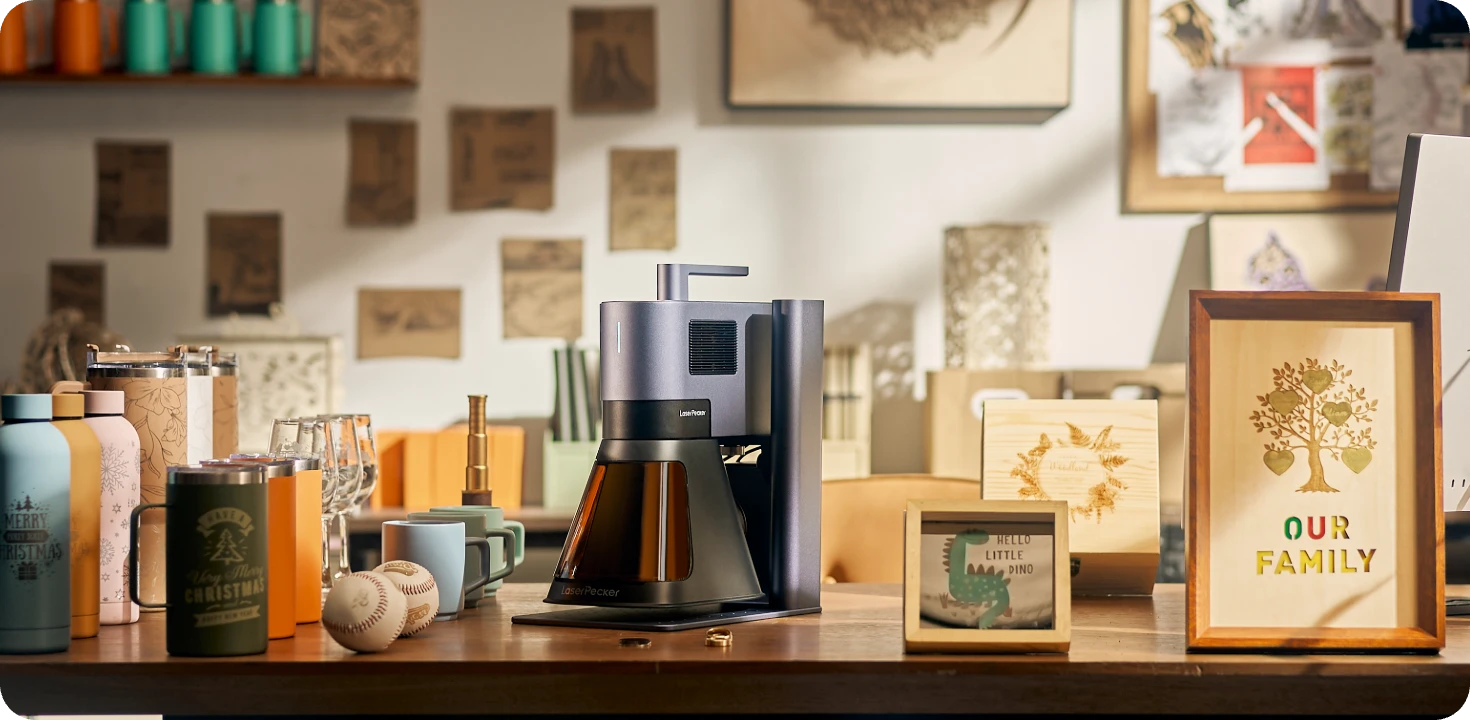
Method 3: Make a Custom Stamp with a Laser Engraver
Laser engraving is one of the fastest and most precise ways to make a custom stamp. It works with rubber, wood, and even metal, making it a popular option for both hobbyists and professional creators.
If you want clean details, repeatable results, and faster production, With a laser engraving machine is an excellent choice. It is especially useful for logos, text, packaging stamps, and business branding.

Recommended Laser Engraver for Making Custom Stamps: LaserPecker LP5
The LaserPecker LP5 is a high-precision dual-laser engraver designed for creating custom stamps, logos, branding tools, craft projects, and personalized business accessories.
-
High-Precision Engraving for Fine Stamp Details
The LP5 delivers highly detailed engraving performance suitable for small text, intricate logos, decorative patterns, and custom stamp artwork. -
10,000 mm/s Ultra-Fast Engraving Speed
The high-speed galvo system helps users quickly produce custom stamp designs with efficient workflow and professional-quality engraving results. -
Deep Engraving and Embossing Capability
The LP5 supports deeper engraving performance, helping users create clearer stamp textures, embossed-style effects, and more visible engraving depth for customized stamp production. -
Wide Material Compatibility
The LP5 supports engraving on rubber, wood, acrylic, leather, and coated materials commonly used for custom stamps, stamp handles, and branding accessories.
- Laser engraver
- Rubber sheets, wood, or metal blanks
- Laser engraving software
- Ink pad or stamp handle
How to Make a Custom Rubber Stamp With the LP5
Rubber is a popular material for stamps. Laser engraving is faster and more exact than carving by hand.
Step 1: Get your design ready on the PC software or mobile app and flip it around so the stamp prints right.
Step 2: Put a rubber sheet in the machine and get it in focus.
Step 3: Set how deep you want to engrave so the design stands out and the background is burned away.
Step 4: Once engraved, cut around the stamp with the laser.
Step 5: Stick it onto a wood block to make it easy to hold, and start stamping.
Step 6: This is good for logos, words, or designs that would take too long to carve by hand.
How to Make a Custom Wood Rubber Stamp With the LP4?
Wood stamps have a natural look. They can also be used to decorate.
Step 1: Pick a flat piece of wood (maple or beech are good).
Step 2: Bring in your design and flip it before marking.
Step 3: Use the laser to mark the design deeply into the wood, so the design sticks up for stamping.
Step 4: Sand the edges smooth if you need to.
Step 5: Try it with an ink pad-wood holds ink differently from rubber, so the print looks older.
Step 6: Wood stamps are great for crafts, packaging, or when you want something that looks handmade.
How to Make a Custom Metal Rubber Stamp With the LP5?
Metal stamps are for pressing into harder stuff like leather, clay, or soft metals. They can also double as wax seals for letters, invitations, or packaging, just heat the stamp slightly, press it into sealing wax, and you get a classy, old-school touch.
Step 1: Get your design ready on the PC software or mobile app and flip it around so the stamp prints right.
Step 2: Put a rubber sheet in the machine and get it in focus.
Step 3: Set how deep you want to engrave so the design stands out and the background is burned away.
Step 4: Once engraved, cut around the stamp with the laser.
Step 5: Stick it onto a wood block to make it easy to hold, and start stamping.
Step 6: This is good for logos, words, or designs that would take too long to carve by hand.
Method 4: Make a Custom Stamp With a 3D Printer
Using a 3D printer is a modern way to make a custom stamp with unique shapes, textures, and detailed designs. This method is popular with makers and DIY creators who want more flexibility than traditional carving methods.
Instead of carving rubber by hand, you can design a stamp digitally and print a mold or stamp base using a 3D printer. Some creators also combine 3D printing with silicone or rubber casting for softer and more durable stamps.
Tools and Materials
- 3D printer
- 3D design software
- Filament or resin material
- Rubber or silicone (optional)
- Ink pad
How to Make a Custom Stamp With a 3D Printer?
- Create your stamp design using 3D modeling software.
- Mirror the design so it stamps correctly.
- Print the stamp or mold using your 3D printer.
- Clean and smooth the printed surface if needed.
- Attach the stamp to a handle or backing block.
- Test the stamp with ink and adjust the design if necessary.
Part 3: Creative Uses for Custom Stamps
Custom stamps are useful for much more than envelopes and paper crafts. Whether you are making stamps for personal projects or business branding, they can be used in many creative ways.
- Business packaging: Add logos, thank-you messages, or branding to boxes, bags, and packaging materials.
- Scrapbooking and crafts: Create custom patterns, decorations, and textures for journals, cards, and DIY projects.
- Classroom use: Teachers can use stamps for grading, rewards, and classroom organization.
- Fabric printing: Use fabric ink to stamp custom designs onto shirts, tote bags, and other textiles.
- Leather and clay embossing: Metal stamps can press designs into leather, clay, and other soft materials for handmade products.
- Invitations and stationery: Personalized stamps work well for wedding invitations, greeting cards, and custom stationery.
FAQs: Questions About Making Custom Stamps
1. What is the best material for making custom stamps?
Rubber is the most popular choice because it is flexible, affordable, and works well with ink. Wood stamps offer a more traditional look, while metal stamps are better for embossing leather, clay, or wax seals.
2. Can I make a custom stamp at home?
Yes. You can learn how to make a stamp at home using simple carving tools, a Cricut machine, a laser engraver, or even a 3D printer depending on your budget and skill level.
3. Is a laser engraver worth it for making stamps?
If you plan to make stamps regularly, a laser engraver can save time and produce more professional results. It also works with multiple materials beyond rubber stamps.
Conclusion
Now that you know how to make a custom stamp, you can choose the method that best fits your project, budget, and skill level. From simple rubber stamps to laser-engraved designs, custom stamp making is an easy way to create personalized and professional results at home.