


Jigsaw puzzles have always been a beloved pastime, blending fun, creativity, and problem-solving into one activity. In the past, puzzles were mostly mass-produced, offering limited designs. But with the rise of laser cutting technology, that has completely changed. Now, you can turn your favorite photos or artwork into one-of-a-kind puzzles with stunning precision.
In this guide, we'll walk you through everything you need to know about laser-cut puzzles—from choosing the right materials to adjusting engraving and cutting settings—and show you how to craft a laser cut wood puzzle from a photo in just five simple steps.

In this article:
- Part 1: The Overview of Jigsaw Puzzle Laser Cutting
- 1.1 What is Jigsaw Puzzle Laser Cutting?
- 1.2 How Does Laser Cutting Work for Jigsaw Puzzle?
- 1.3 Laser Engraving & Cutting Machines for Jigsaw Puzzles
- Part 2: Applications of Laser-Cut Puzzles
- Case Study: Craft a Laser-Cut Wood Jigsaw Puzzle from a Photo in 5 Steps💡
Part 1: The Overview of Jigsaw Puzzle Laser Cutting
1.1 What is Jigsaw Puzzle Laser Cutting?
Jigsaw puzzle laser cutting is the process of using a laser cutter to create puzzles with precise and consistent shapes.
Unlike traditional cutting methods, a laser beam can cut intricate curves and unique puzzle tabs with extreme accuracy. This allows makers to design puzzles from photos, artworks, or custom patterns while ensuring every piece fits perfectly. It's a popular method for producing personalized puzzles, small-batch gifts, or professional-quality products.

Source: LaserPecker LP4 FaceBook Group
1.2 How Does Laser Cutting Work for Jigsaw Puzzles?
Laser cutting works by directing a focused laser beam onto the puzzle material—such as wood, acrylic, or cardboard. The laser follows the design file prepared in software, cutting clean lines to form puzzle pieces.
Because the beam is so fine, it can produce complex interlocking shapes without damaging the material. Depending on the settings, the same laser can also engrave images, text, or logos onto the puzzle surface, adding a custom touch.
1.3 Laser Engraving & Cutting Machines for Jigsaw Puzzles
Not all laser machines are equally suited for creating jigsaw puzzles. For the best results, you need a machine that combines precision, power, and versatility.
- High precision and stability: Ensures puzzle pieces fit perfectly, with clean edges every time.
- Wide material compatibility: Easily works with wood, acrylic, MDF, and other popular puzzle materials.
- Large working area: Cut bigger puzzles or multiple pieces in a single run, saving time and effort.
- Powerful laser output: Strong enough to slice through materials cleanly and efficiently.
Diode lasers are cost-effective for thin wood or cardboard puzzles, while CO₂ lasers are more powerful and versatile for thicker materials. Choosing the right machine depends on your production needs—whether you're making DIY puzzles at home or running a small business
Actually, it depends on your engraving needs. For home or small-scale jigsaw puzzle laser cutting project, diode laser cutter like LP5, LP4 or enen LP2 Plus are the best choice. Because these diode laser cutting machines are easy to use and budget-friendly compared with other jigsaw puzzle cutting tools.

Part 2: Applications of Laser-Cut Puzzles
Laser-cut puzzles are not just toys—they have a wide range of applications in education, entertainment, branding, and even home décor. Thanks to the precision of laser cutting, puzzles can be customized for different purposes, from fun gifts to professional products.
Educational Tools
Puzzles help children develop problem-solving, memory, and motor skills. Laser-cut puzzles allow educators to design custom learning tools, such as alphabet puzzles, number games, or geography maps. They're durable, reusable, and easy to tailor for different age groups.
Personalized Gifts
Custom puzzles made from photos or artwork are popular gifts for birthdays, weddings, and anniversaries. With laser cutting, every piece can be perfectly shaped while the engraved or printed image adds a personal touch. These puzzles turn cherished memories into an engaging activity..
Promotional & Branding Products
Businesses often use custom puzzles as unique marketing tools. By engraving company logos or brand messages onto puzzle pieces, companies can create interactive giveaways that stand out from ordinary merchandise.
Home Décor & Art
Laser-cut puzzles can also be transformed into decorative items. For example, a finished wooden puzzle of a scenic photo can be framed and displayed as wall art. Artists and crafters often use puzzles to experiment with intricate cutouts and creative designs.
Hobby & Collectibles
Puzzle enthusiasts enjoy unique designs beyond mass-produced options. Laser-cut puzzles can feature complex shapes, irregular patterns, or themed collections, appealing to collectors and hobbyists who appreciate craftsmanship.
💡 Case Study: Craft a Laser-Cut Wood Jigsaw Puzzle from a Photo in 5 Steps
Preparation checklist for laser cutting Wood Jigsaw Puzzle:
- Cutting Material: 2 mm Plywood Sheet
- Cutting Machine: Diode Laser Cutter
- Cutting Design: Jigsaw puzzle designs, letters, shapes, etc.
The process of laser cutting wood jigsaw puzzle is straightforward. So, How long does it take to laser cut jigsaw puzzle? Don't worry, just follow these 5 simple steps to get your laser cut jigsaw puzzle in a few hours!
Step 1: Choose Your Material - Plywood Sheet
Selecting the right material is crucial for laser cutting Jigsaw Puzzle. Different materials require specific laser settings to ensure precise cutting. Besides, please remember that it's important to ensure that the jigsaw puzzle's material is laser safe to avoid any potential safety hazards.
In this guide, we'll use a case study on laser cutting plywood Jigsaw Puzzle!

Step 2: Choose the Right Laser Cutting Machine for Plywood Cutting
Here, we recommend LaserPecker 4 (LP4) that excels in Plywood Jigsaw Puzzle laser cutting.
*Aside from the LP4, you can also choose LP5, which also delivers great performance for plywood Jigsaw Puzzle (cuts up to 20 mm basswood.) and wood embossing.
Or, you can choose the LaserPecker LX2. With powerful 20W/40W/60W diode laser options, it's built to cut through larger materials effortlessly—making it the ultimate choice for crafting impressive, large-scale jigsaw puzzles.
Step 3: Prepare Your Cutting Design
Use LaserPecker graphic design app/software or third-party graphic design tools like photoshop to create or import the jigsaw puzzle design you want to cut on the plywood's surface. Consider size, shape, and other details.
*You can also visit LaserPecker CraftZone for inspiration, generate jigsaw puzzle template online or to purchase laser cut jigsaw puzzle files online.
Step 4: Set up the Jigsaw Puzzle Laser Cutting Machine
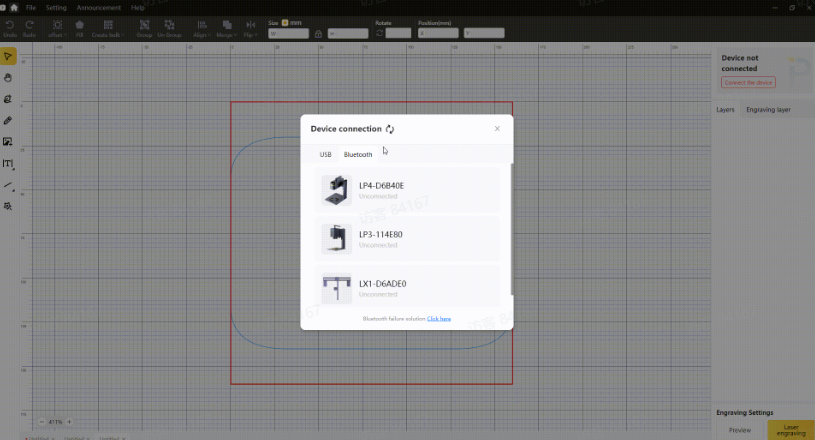
Firstly, Make sure your cutter is powered on, and then connect your laser cutter to your computer or mobile device using the appropriate interface (Wifi, USB cable, Bluetooth, etc.)
Secondly, Open the LaserPecker Design Space and load your design. (formats like JPG/PNG/G-Code/SVG etc are all acceptable)

Thirdly, place the items in the designated working area, turn on Preview Mode, and make sure the laser is properly focused.
Fourthly, check if your design fits properly on the material surface. If not, adjust its size and position to match the material's dimensions.

Finally, Access the software's laser settings to adjust parameters like power, speed, and resolution according to the Jigsaw Puzzle's properties and design intricacy.
To get the best result, you need to Eegrave the photo onto the surface for a permanent, detailed look and then let the laser cutter cutting along the puzzle template lines to separate the pieces.
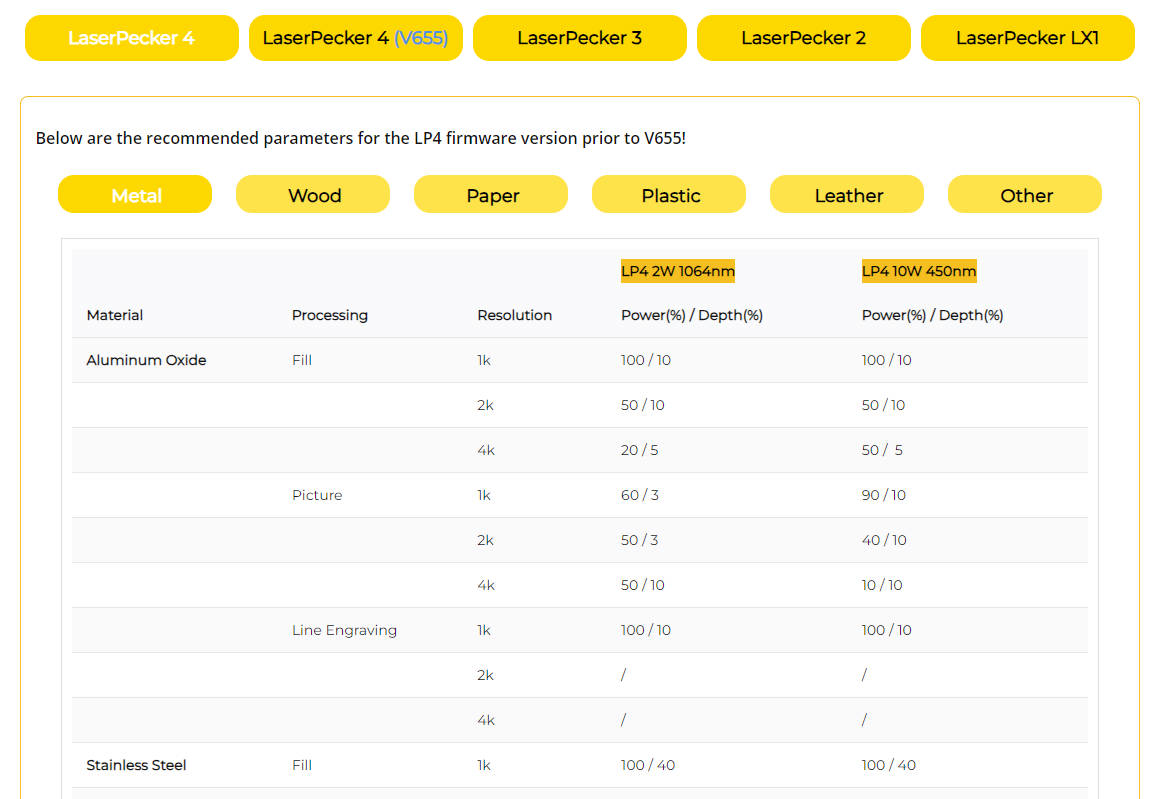
the recommended LaserPecker LP4 material settings are:
Laser Engraving: 10 W 450nm Diode Laser; Power: 100%; Depth: 90%; Pass: 1.
Laser Cutting: 10 W 450nm Diode Laser; Power: 100%; Depth: 10%; Pass: 10.
To explore other recommended laserpecker engraving and cutting parameters, refer to the settings table that applies to any laserpecker machines, including LP1, LP2, LP3, LP4 and LP5.
Step 5: Start Cutting Your Jigsaw Puzzle With Laser Now
Double-check everything to avoid mistakes. Then, hit the start button and watch the magic happen. The laser brings your design to life. Keep an eye on it, and you're all set! Once cut, mix the pieces and start assembling! You can gift it to a loved one, use it as a creative learning tool, or frame it as wall art after assembly.
When operating a laser machine, it's advisable to wear goggles or use a laser protection cover to protect your eyes and body from potential harm, as the blue laser can pose risks.
Additionally, please be mindful that smoke or toxic gases may be emitted during the laser cutting process. Wearing a mask or employing an air purifier is essential for safety.
Conclusion
Laser cutting has revolutionized the way we create jigsaw puzzles, turning simple photos into interactive keepsakes. From designing and engraving to cutting and assembling, the process is straightforward yet highly rewarding.
A laser-cut puzzle is not just a game—it's a personalized piece of art that carries lasting memories. Whether you're crafting one for family fun, a special occasion, or creative projects, laser cutting unlocks endless possibilities. With just a bit of creativity, your puzzle can be as unique as the story behind the photo.