


Challenge coins are popular collectible items used for military recognition, club membership, corporate branding, commemorative events, and personalized gifts.
Depending on the materials, tools, and level of detail you want, challenge coins can be made using traditional crafting methods or modern digital fabrication technologies.
In this guide, we will compare four practical methods for making challenge coins and explore their tools, processes, advantages, and ideal applications.

In this article:
Method 1: Make Challenge Coins with Electric Tools
Using electric tools is one of the most practical ways to make custom challenge coins at home or in a workshop. This method allows makers to create personalized wooden, acrylic, resin, or soft metal challenge coins with engraved details and decorative finishes.
Electric tools are especially useful for hobby projects, commemorative coins, cosplay accessories, club tokens, and personalized gifts. Compared with fully manual crafting, electric tools improve cutting accuracy, shaping consistency, and production speed.
Materials and Tools Needed
- Wood, acrylic, resin blanks, or soft metal discs
- Rotary tool or Dremel
- Drill or drill press
- Orbital sander or sandpaper
- Metal stamps or engraving bits
- Paint, enamel, or metallic coating
- Polishing cloth or buffing wheel
- Ruler or measuring tools
- Protective glasses and gloves
Steps to Make Challenge Coins with Electric Tools
- Prepare the Coin Blank: Choose a wood, acrylic, resin, or soft metal blank in the desired size and thickness for the challenge coin.
- Shape the Coin: Use a rotary tool, sander, or cutting tool to smooth the edges and refine the circular shape if necessary.
- Create the Design Layout: Sketch or print the logo, emblem, text, or decorative artwork for the challenge coin surface.
- Engrave or Carve the Details: Use engraving bits, rotary tools, or metal stamps to add names, patterns, logos, or decorative textures.
- Apply Decorative Finishing: Paint, enamel fill, metallic coating, or color accents can be added to improve visual appearance.
- Polish the Surface: Buff and polish the challenge coin to create a cleaner and more professional finish.
Pros and Cons of Making Challenge Coins with Electric Tools
Pros: More affordable than industrial coin production, beginner-friendly, suitable for personalized projects, and flexible for different materials.
Cons: Limited precision compared with CNC or laser engraving, more manual finishing required, and consistency may vary for batch production.
Method 2: Make Challenge Coins with a CNC Machine
A CNC machine is one of the most precise and professional ways to make custom challenge coins. Unlike manual crafting methods, CNC routers and desktop CNC engravers use digital design files to carve detailed logos, text, and patterns with high consistency and accuracy.
This method is ideal for military-style challenge coins, commemorative tokens, club emblems, branded promotional coins, and small-batch production projects. CNC machining also allows for deeper carving, cleaner edges, and repeatable production compared with manual engraving techniques.
Materials and Tools Needed
- CNC router or CNC engraving machine
- Wood, brass, aluminum, acrylic, or resin blanks
- CAD or vector design software
- CNC control software
- Engraving bits or carving bits
- Clamps or hold-down fixtures
- Sandpaper or polishing tools
- Paint, enamel, or metallic coating (optional)
- Protective glasses and hearing protection
Steps to Make Challenge Coins with a CNC Machine
- Create the Coin Design: Design the logo, emblem, text, borders, and decorative artwork using CAD or vector design software.
- Prepare the Coin Blank: Secure the wood, metal, acrylic, or resin blank onto the CNC machine bed using clamps or fixtures.
- Configure the CNC Toolpath: Import the design file into CNC software and adjust cutting depth, engraving settings, and feed rate.
- Engrave the Coin Surface: Start the CNC engraving process to carve the detailed design onto the challenge coin blank.
- Cut and Shape the Coin: If necessary, use the CNC machine to cut the outer circular shape and edge profile of the coin.
- Apply Decorative Finishing: Add paint filling, enamel coloring, metallic coating, or polishing for a more professional appearance.
- Polish the Final Coin: Smooth and polish the challenge coin surface to improve detail visibility and surface quality.
Pros and Cons of Making Challenge Coins with a CNC Machine
Pros: High precision, repeatable production, deep carving capability, professional appearance, and excellent customization flexibility.
Cons: Higher equipment cost, requires CNC software knowledge, and setup may be more complex for beginners.
Method 3: Make Challenge Coins with a 3D Printer
A 3D printer is a modern and highly customizable way to make challenge coins. Instead of carving or machining the design manually, a 3D printer builds the coin layer by layer from a digital model, allowing detailed logos, emblems, and decorative textures to be created with high consistency.
This method is ideal for cosplay props, commemorative tokens, club emblems, gaming collectibles, prototype coin designs, and custom display pieces. 3D printing also makes it easier to produce multiple matching challenge coins with complex shapes and layered details.
Materials and Tools Needed
- 3D printer
- PLA, PETG, resin, or metallic filament
- 3D modeling software or STL design files
- Slicer software
- Sandpaper or deburring tools
- Primer, metallic paint, or enamel coating (optional)
- UV curing station (for resin printers)
- Protective gloves and mask
Steps to Make Challenge Coins with a 3D Printer
- Create the Coin Design: Design the logo, emblem, borders, text, and decorative artwork using 3D modeling software or download an STL file.
- Prepare the Print File: Import the model into slicer software and adjust print settings such as layer height, infill, and support structures.
- Load the Printing Material: Install the filament or resin into the 3D printer and ensure the print bed is properly leveled.
- Print the Challenge Coin: Start the printing process and monitor the first layers to ensure proper adhesion and detail accuracy.
- Remove and Clean the Print: Remove the printed coin from the build plate and clean away support material if necessary.
- Sand and Finish the Surface: Smooth rough surfaces and layer lines using sandpaper or polishing tools.
- Apply Decorative Coating: Paint, metallic coating, enamel filling, or weathering effects can be added to improve the appearance of the challenge coin.
Pros and Cons of Making Challenge Coins with a 3D Printer
Pros: Highly customizable, excellent for complex shapes, repeatable production, and suitable for prototypes or decorative display coins.
Cons: Visible print layers may require sanding, metallic appearance usually requires painting, and fine details depend on printer quality and settings.
Method 4: Make Challenge Coins with a Laser Engraver
Laser engraving is one of the most precise and efficient ways to make custom challenge coins. Instead of manually carving or machining the surface, a laser engraver follows a digital design file to create highly detailed logos, text, borders, and decorative artwork with excellent consistency.
This method is ideal for military challenge coins, commemorative tokens, company branding, club emblems, gaming collectibles, and personalized collector pieces. Laser engraving also allows fast customization and professional-quality marking on both metal and non-metal materials.
Materials and Tools Needed
- Laser engraver
- Stainless steel, brass, aluminum, acrylic, leather, or coated metal blanks
- Vector design software
- Masking tape (optional)
- Polishing cloth or buffing tools
- Paint filling or enamel coating (optional)
- Ventilation system
- Protective glasses and mask
Steps to Make Challenge Coins with a Laser Engraver
- Create the Coin Design: Design the logo, emblem, borders, names, or decorative artwork using vector software such as SVG or DXF format.
- Prepare the Coin Blank: Place the metal or acrylic coin blank onto the laser engraver workspace and ensure proper alignment.
- Adjust the Laser Settings: Configure the laser power, speed, frequency, and engraving settings according to the material type.
- Engrave the Coin Surface: Start the laser engraving process to permanently mark the challenge coin with detailed graphics and text.
- Apply Decorative Finishing: Add paint filling, enamel coloring, or metallic finishing if desired to improve visual contrast.
- Polish the Final Coin: Clean and polish the challenge coin surface for a more professional appearance.
Pros and Cons of Making Challenge Coins with a Laser Engraver
Pros: High precision, permanent marking, fast production speed, excellent detail quality, and ideal for personalized or batch production.
Cons: Requires a laser engraver and design software, some metals may require Fiber laser systems, and deep embossing effects may require multiple passes.
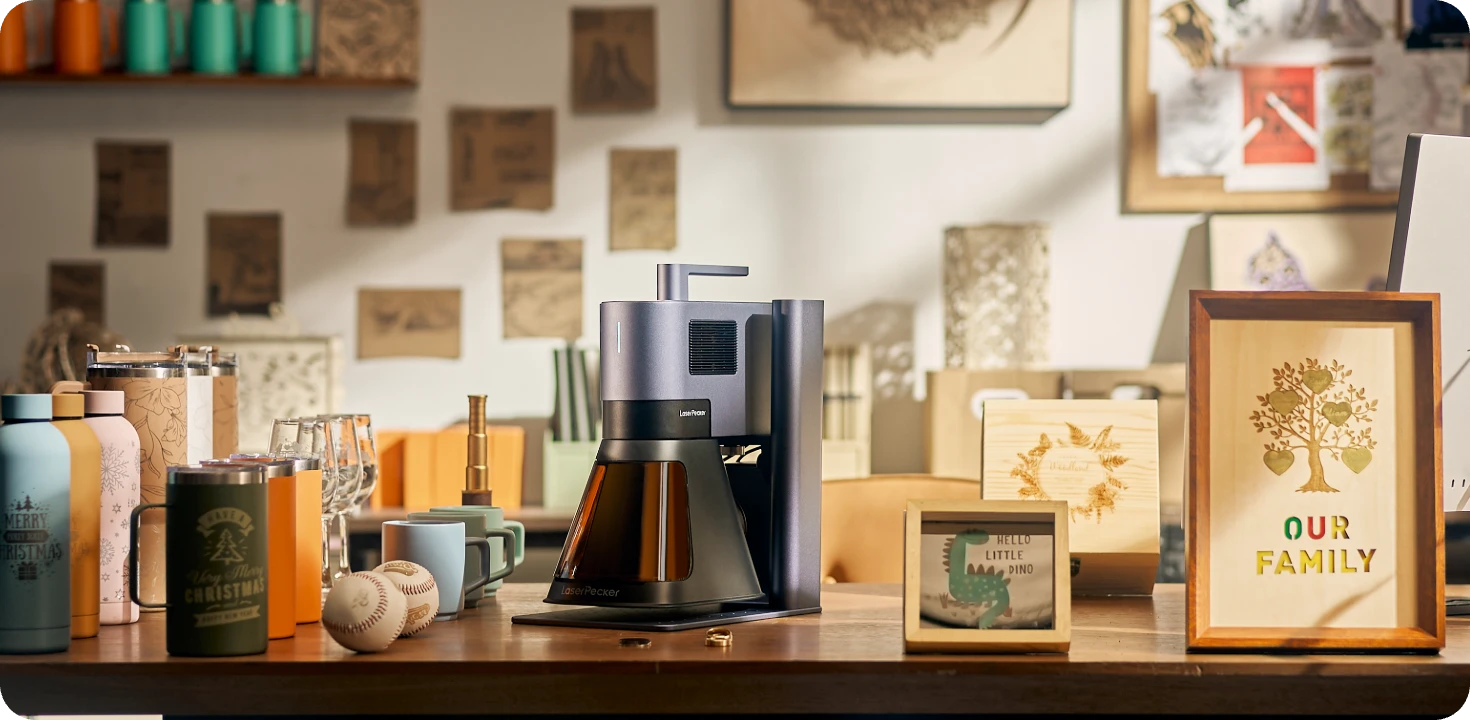
Recommended Laser Engraver for Challenge Coin Projects: LaserPecker LP5
The LaserPecker LP5 is designed for makers who need high-precision engraving and multi-material compatibility for challenge coin production and collectible engraving projects.
Featuring a dual-laser system with both Fiber and Diode lasers, the LP5 is especially suitable for engraving stainless steel, brass, anodized aluminum, coated metals, acrylic, leather, and other common challenge coin materials.
-
20W Fiber + 20W Diode Dual Laser System
Supports engraving on both metal and non-metal challenge coin materials with high versatility. -
High-Speed Galvo Engraving up to 10,000 mm/s
Enables fast engraving of detailed logos, military emblems, serial numbers, and decorative artwork. -
0.0027 mm Engraving Precision
Ultra-fine precision helps create sharp text, clean borders, and highly detailed challenge coin artwork. -
120 × 160 mm Working Area
Provides enough workspace for batch engraving multiple challenge coins in a single session. -
Compact Desktop Design
Suitable for workshops, home studios, craft businesses, and portable event engraving setups. -
Wide Material Compatibility
Supports stainless steel, brass, aluminum, coated metal, acrylic, leather, wood, and many other maker materials.
FAQs: Hot Questions about Making Challenge Coins
Q1: What Are Challenge Coins Used For?
Challenge coins are used for many different purposes including military recognition, corporate branding, club membership identification, event commemorations, and collectible projects.
Today, challenge coins are also commonly used as personalized gifts, promotional products, and decorative collector items.
Q2: What Materials Are Used to Make Challenge Coins?
Challenge coins are commonly made from materials such as brass, copper, zinc alloy, stainless steel, acrylic, wood, and resin.
Brass and zinc alloys are popular because they are cost-effective and relatively easy to process, while stainless steel provides better durability and a cleaner modern appearance.
Q3: What Size Are Most Challenge Coins?
Most challenge coins are typically between 1.5 and 2 inches in diameter.
However, custom challenge coins can be made in many different sizes depending on the design style, purpose, and level of decorative detail required.
Q4: Can You Make Challenge Coins at Home?
Yes, challenge coins can be made at home using methods such as engraving, CNC carving, 3D printing, resin casting, or laser engraving.
Modern desktop fabrication tools and laser engravers have made it much easier for hobbyists and small businesses to create personalized challenge coins without industrial manufacturing equipment.
Q5: How Thick Should a Challenge Coin Be?
Most challenge coins are usually around 2 mm to 4 mm thick.
Thicker coins often feel more premium and durable, while thinner coins may be lighter and easier to carry depending on the intended use.
Conclusion
Making challenge coins can range from simple handcrafted projects to highly detailed digital production depending on the method you choose.
Electric tools and 3D printing are suitable for creative DIY projects, while CNC machines and laser engravers provide greater precision, cleaner detail, and better consistency for professional-looking results.
Whether you are creating military-style coins, commemorative collectibles, promotional products, or personalized gifts, choosing the right method will help you achieve better quality and a more efficient workflow.

